Anyway, this is the story of the light on this very icky Singer 201-2. I have been scamming parts off of this machine for the 201 Centennial. I have all the parts. The tension spring (not check spring but the bee hive tension spring) the bobbin case position bracket. The parts are probably fine but I wanted the best ones for the Centennial since it is going to market.
But I would like to get this one running. Then all of the 201s that I have will be running. If this one can't get up and stitching it will become a parts machine.
Since the 201 is Singer's best, supposedly, I think it is worth the effort to try. And you all know how I love an icky challenge. Just look at the melted latex on the pillar just above the light wire port. YYYYEEWWW

I took this all apart.

I did remove the wires from the terminal before I did all that though.
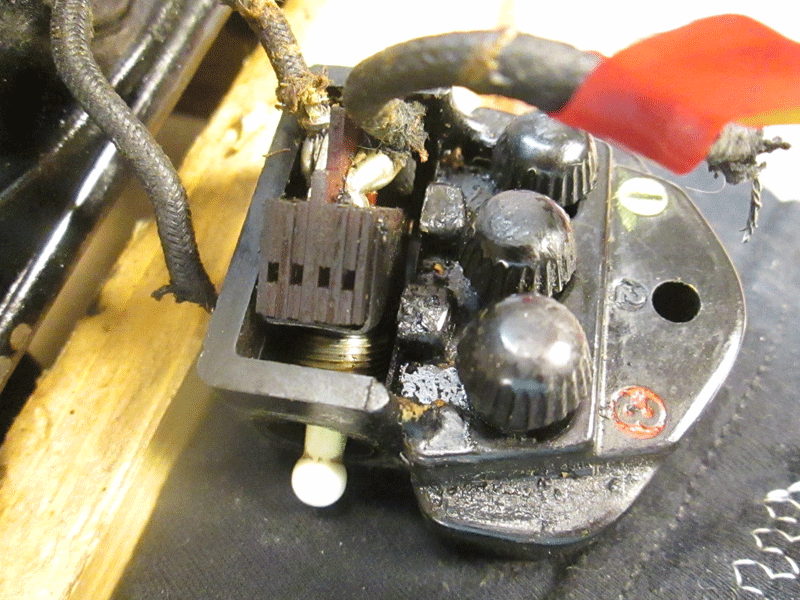


I found out that the wire that goes to the three pin terminal is soldered on to the switch. I thought that it would be best to try to buy a new switch. I did . It doesn't fit.... I don't know if there are others that might be narrower. But I may practice de-soldering and see if I can't retrieve this one.

The wires snake through the machine. I already looked. I can get them out. But there is some sheathing around the wires that must be replaced.
But before I do any of that I have to be sure that I know how to de-solder. At the other end of these wires is the light. The connections to the light are also soldered.

And the motor that I thought (naively) that I could simply install, also, needs to be re-wired. Or maybe I could just re-wire the end.....Nah. gotta do it right.

More work. For a machine that may not stitch. Oh I think that is overly dramatic. This machine will stitch and I will learn how to re-wire a 201-2 light. Yippee.. I would rather go to the dentist.
I love following along with the 201 clean up. I just realized now that I will have to do my light too. And how did you get the insulation goo off? I can peel some of the bigger globs off but I have a rather large chunk where the wire runs down the back of the machine and into the motor. It's like the wire coating melted and looks like black left over macaroni and cheese.
ReplyDeleteAnd thanks for the tension pin tip, I figured wd40 was a no-no.
I used degreaser on a q tip to remove the melted wire insulation. I did get over zealous with the thicker stuff and squirted the degreaser straight on. It then ran down the bed of the machine and left a couple of runs.... So I went back to tedium and the q tip.
DeleteI just remembered that someone on the WEFIXIT yahoo group mentioned Krud Kutter that she bought at a big box home improvement store. I think I will try that. Gotta go there today anyway on my way to get the Boye.
DeleteKrud kutter?.... Sounds promising! I have a few places where the lacquer has crazed or has just plain come off. I think it got really really hot at some point. Anywho, I read that series on the Quilter forum that Rain told me about and am very intrigued about re lacquering my machine. Have you ever tried it? I so want it back to 1941 shiny but I do not want to yuck it up. Thanks!!
ReplyDeleteOn one of the boards I read this gal just re-insulated her wires instead of removing all the connections. Doable?
ReplyDeletehttp://sewing.patternreview.com/cgi-bin/sewingclasses/board.pl Follow it through. Rain was here as well.
Dre
DeleteI would not just re-insulate the wires. I couldn't find the reference on Pattern review. Sorry.
Unsoldering shouldn't be too big of a problem. When I installed boilers I unsoldered pipes all the time. I would just clean the joint a bit, apply a bit of paste flux, apply heat and boink! apart it would come.
ReplyDeleteThat's reassuring. But boiler pipes are a bit bigger than toggle switches and I fear that solder will just run all over.
DeleteTo keep the solder from running, you buy a braided metal called de-soldering wick.
Deletehttps://www.youtube.com/watch?v=AcbezX8TrOU
Hi Elizabeth, How did you manage to get the solder off of the 201 switch? I am rewiring a 201 right now and have discovered the solder blob! Thank you!
ReplyDeleteOh my. This was four years ago. I don't remember specifically. However, I have used a piece of wire on top of the old solder, heat up the solder and the solder migrates to the new wire. Not elegant but good enough
Delete