A blog devoted to my vintage sewing machines and how I find them, fetch them and fix them.
Showing posts with label Singer 201. Show all posts
Monday, May 27, 2013
Back on the Bench
I always like to make a project when I finish a refurbish. Today I took this 201 up to the sewing loft and made a tote bag for its foot controller and cord. The machine sewed very nicely. I was pleased as could be. I thought I heard that noise again. The screeching noise but it was not as loud, not as growly. Then, I set about making Wonder Wallet. The aforementioned noise returned (see previous post). I thought it was a gear. Nope. I tried to run the machine a full tilt, but it seemed to get better only to return. Since the noise was random and not improving with time, I had to give up sewing for the day and return the machine to the bench.
My theory about the armature was wrong, clearly, since the motor continues to make the noise. I suppose it could be that the grease wicks are not yet greasy enough to lube the shaft of the armature. It really sounds like a bad bearing or a too tight belt. Since I cannot find a bearing or a belt anywhere on this motor, I have to start over. I pulled the motor AGAIN and found that the worm does seem a bit tight in one spot on rotation.
Until the next time, I will keep you updated.
Friday, April 26, 2013
Singer 201-2 Tension assembly
I have posted A LOT about the tension assembly. In all of those posts, I have not shown how the check spring fits into the tension stud. So here it is. I have removed the tension assembly from the machine. To do so, find the set screw just behind the thread guide and loosen it. If you are lucky the tension assembly will pull out. If it is stuck, loosen it with some tri flow or LW (liquid wrench) and wait.
The parts.
Please note that the tension release pin must be placed into the stud as shown. I recommend that you do so AFTER you have placed the check spring, tension discs and thread guard on the stud. You will be less likely to lose it.
Sandwich the tension discs (flats facing eachother) and the thread guard in between the coil of the check spring and the eyelet.
Place this onto the stud so that the tail of the check spring nestles into one of the grooves on the tension stud. If the check spring has too much bounce, you must move the tail to a different groove. If it doesn't have enough, move it to a groove the opposite way.
(Don't forget the tension release pin. It must go into the tension stud before you put the indicator on.)
Next comes the indicator. Place it on the stud with the flat side next to the thread guard.
Now place the tension spring onto the stud so that the first half coil of the spring straddles the lower half of the stud.
Make sure that the + and - are positioned on top and tighten the set screw.
The parts.
Please note that the tension release pin must be placed into the stud as shown. I recommend that you do so AFTER you have placed the check spring, tension discs and thread guard on the stud. You will be less likely to lose it.
![]() |
| tail of the check spring |
(Don't forget the tension release pin. It must go into the tension stud before you put the indicator on.)
Now place the tension spring onto the stud so that the first half coil of the spring straddles the lower half of the stud.
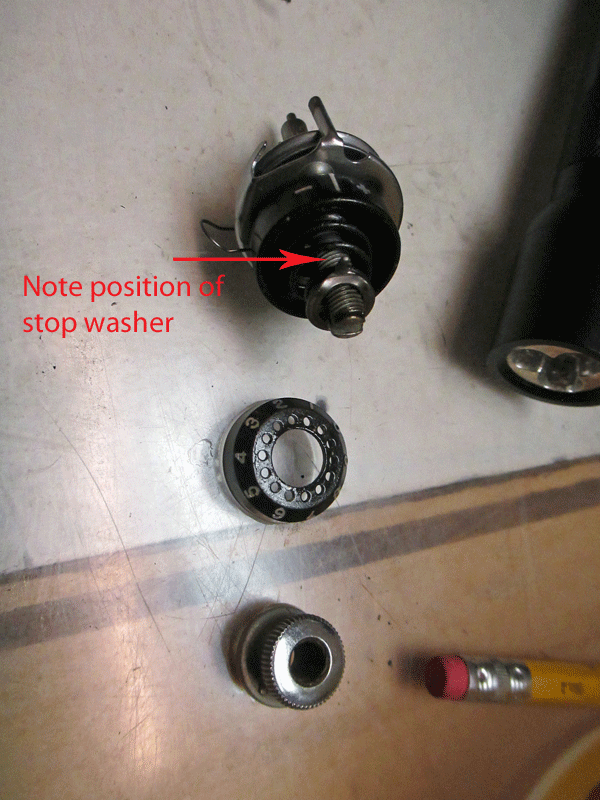
Next comes the stop washer positioned on the stud so that the extension sits above the tension stud.
Now place the numbered dial on the stud positioned so that the Number 2 is oppositethe stop washer extension.
Compress the numbered dial against the spring as you thread the thumb nut onto the tension stud with the pin toward the numbered dial. Guide the pin into one of the holes on the numbered dial. Place the whole assembly on the machine, making sure that the extension on the thread guard fits into the hole on the machine. The presser foot must be DOWN when you out the tension assembly back on the machine. Position the check spring so that it rests on the extension on the left side of the thread guide. Make sure that the + and - are positioned on top and tighten the set screw.
Friday, April 12, 2013
Buddy Folly
I took Steven along in hopes he would prevent it. He didn't. I truly felt a strong resolve that I could resist. I would only buy it if it was in really pristine shape. Truly I believed that.
But I caved. I bought it. It is far from prisitne. I am weak. That is all there is to it.
The decals are lovely from the front and the paint is good. The machine is only 55 years old. I don't think it was used much.
There is a bit of a flaw on the back. The face plate is a bit rough. The hook is icky icky icky. Rusty Rusty Rusty. The wiring is good, though. The motor likely is fine. I think I can save him, I really do.
I took the hook out. I removed the bobbin case first and almost had a heart attack. When I released the retaining clip on the ring I thought I had broken the clip.. Nope, the ring just jumped right out of the clip. Next the feed dogs came off and then the position plate. (I still don't know if it is supposed to be bent like that or not. Drives me crazy)
Then I was able to remove the hook, in all its glory.
A picture is worth a thousand words.
I started to clean away the rust with the honing stick. I have more work to do.
Perhaps it is easier to note the before and after comparison on the retaining ring. I haven't finished it yet, either. You can see how much cleaner it is, halfway down.
I think it will be ok. Just more work. I will, no doubt, take the clips off of the hook and really scrub it and hone it. I just hope I can get into all of the little crevices.
And I hope it wasn't folly to buy this machine. I guess, though, that will be a good name for this machine. Buddy Folly. Boy. It has been a long time since I named a machine. Wonder if this means its a keeper?
Or Peggy Sue? NAH.
But I caved. I bought it. It is far from prisitne. I am weak. That is all there is to it.
The decals are lovely from the front and the paint is good. The machine is only 55 years old. I don't think it was used much.
There is a bit of a flaw on the back. The face plate is a bit rough. The hook is icky icky icky. Rusty Rusty Rusty. The wiring is good, though. The motor likely is fine. I think I can save him, I really do.
I took the hook out. I removed the bobbin case first and almost had a heart attack. When I released the retaining clip on the ring I thought I had broken the clip.. Nope, the ring just jumped right out of the clip. Next the feed dogs came off and then the position plate. (I still don't know if it is supposed to be bent like that or not. Drives me crazy)
Then I was able to remove the hook, in all its glory.
A picture is worth a thousand words.
I started to clean away the rust with the honing stick. I have more work to do.
Perhaps it is easier to note the before and after comparison on the retaining ring. I haven't finished it yet, either. You can see how much cleaner it is, halfway down.
I think it will be ok. Just more work. I will, no doubt, take the clips off of the hook and really scrub it and hone it. I just hope I can get into all of the little crevices.
And I hope it wasn't folly to buy this machine. I guess, though, that will be a good name for this machine. Buddy Folly. Boy. It has been a long time since I named a machine. Wonder if this means its a keeper?
Saturday, January 12, 2013
Ventilation
Betsy yelled at me Thursday night as we were leaving work.
"What are you doing, working with acetone in a non ventilated room?"
"Ummmm, geeee, Ummmm."
"And with a cough and a cold, no less. You KNOW better."
And she is right. I do know better. But really, I wasn't working with A LOT of acetone. And the container was all sealed up tight.
So today, when I went out to work with the ATFacetone mix, I opened the window. That should keep her happy.
I don't know that the miracle mix was all that spectacular. I put the lifter roller in the vice and blew the hair dryer straight onto it (as they say here in Otsego County) for five minutes. I also had the little heater warming my feet, until the circuit breaker flipped and I had to choose between the two. (Me and Carole King). I chose the hair dryer because I really really wanted to get that OTHER 201 back together. I am about 201d out. The roller was still stuck. No magic here. I dribbled some Tri flow and applied heat some more.
I set to work cleaning other parts as I heated the lifter roller. The bobbin case retaining ring was pretty gooey. I used Krud Kutter on it and rinsed with denatured alcohol.
Hmmmm, I wonder if Krud Kutter would work on the lifter roller? Worth a try, nothing else has seemed to work.
I dribbled some Krud Kutter on it and heated it up some more and then grabbed the plyers. I know that this was risky. I could really bugger up the roller with those metal teeth. But, something gave, every so slightly. And I just kept turning and turning and wiping Krud off the edge of the roller and finally I could turn it with my fingers. I rinsed everything in denatrued alcohol and applied copious amounts of Tri Flow. I kept turning the rollers until the exudate from around the roller was clear. Nice and smooth now. And reinstalled.
Honestly, it likely was a combination of all the solvents and the heat, rather than just one thing that got that roller rolling.
The machine sews nicely. I don't think there is any difference in speed. But at least I know that no one would be wearing a flat spot on the roller when the machine is in use. Plus, now I know how to adjust feed dog height on a 201-2. Might be useful to know.
"What are you doing, working with acetone in a non ventilated room?"
"Ummmm, geeee, Ummmm."
"And with a cough and a cold, no less. You KNOW better."
And she is right. I do know better. But really, I wasn't working with A LOT of acetone. And the container was all sealed up tight.
So today, when I went out to work with the ATFacetone mix, I opened the window. That should keep her happy.
I don't know that the miracle mix was all that spectacular. I put the lifter roller in the vice and blew the hair dryer straight onto it (as they say here in Otsego County) for five minutes. I also had the little heater warming my feet, until the circuit breaker flipped and I had to choose between the two. (Me and Carole King). I chose the hair dryer because I really really wanted to get that OTHER 201 back together. I am about 201d out. The roller was still stuck. No magic here. I dribbled some Tri flow and applied heat some more.
I set to work cleaning other parts as I heated the lifter roller. The bobbin case retaining ring was pretty gooey. I used Krud Kutter on it and rinsed with denatured alcohol.
Hmmmm, I wonder if Krud Kutter would work on the lifter roller? Worth a try, nothing else has seemed to work.
I dribbled some Krud Kutter on it and heated it up some more and then grabbed the plyers. I know that this was risky. I could really bugger up the roller with those metal teeth. But, something gave, every so slightly. And I just kept turning and turning and wiping Krud off the edge of the roller and finally I could turn it with my fingers. I rinsed everything in denatrued alcohol and applied copious amounts of Tri Flow. I kept turning the rollers until the exudate from around the roller was clear. Nice and smooth now. And reinstalled.
Honestly, it likely was a combination of all the solvents and the heat, rather than just one thing that got that roller rolling.
The machine sews nicely. I don't think there is any difference in speed. But at least I know that no one would be wearing a flat spot on the roller when the machine is in use. Plus, now I know how to adjust feed dog height on a 201-2. Might be useful to know.
Tuesday, January 1, 2013
Don't be afraid of the.....tension assembly
People seem to fear dismantling a tension assembly. I am not sure why. Singer tension assemblies are easy. They are pretty much the same among the older machines and it can't get much easier than the older ones with no numbered dial. When I went back out to the toasty warm shop I had planned to shine up the machine and take photos. I had forgotten about the tension assembly.
Now some folks advise taking dental floss and cleaning the tension discs by flossing between them with it. I just don't see how you can get an assembly really clean like that. I mean how would flossing the tension discs get rid of that dust and lint?
I take photos as I go along. By now I am fairly familiar with this Singer tension assembly. I took some photos just the same.
I like seeing all the parts in the denatured alcohol bath. Something about it makes me happy.
This makes me happiest. I have not stitch tested the machine. Only Wrigley made it to the shop. Wilson is a bit timid traipsing through the snow to the shop. I was worried that he might be waiting outside for me. It is getting colder and he is a poodle after all. No undercoat. He's also a pretty skinny guy. I had to come in the house.
But not before I took some photos of the finished product.
Now some folks advise taking dental floss and cleaning the tension discs by flossing between them with it. I just don't see how you can get an assembly really clean like that. I mean how would flossing the tension discs get rid of that dust and lint?
I take photos as I go along. By now I am fairly familiar with this Singer tension assembly. I took some photos just the same.
I like seeing all the parts in the denatured alcohol bath. Something about it makes me happy.
This makes me happiest. I have not stitch tested the machine. Only Wrigley made it to the shop. Wilson is a bit timid traipsing through the snow to the shop. I was worried that he might be waiting outside for me. It is getting colder and he is a poodle after all. No undercoat. He's also a pretty skinny guy. I had to come in the house.
But not before I took some photos of the finished product.
Thursday, October 25, 2012
Clean Parts
The truth about the 201......Andrea wasn't really sure she didn't want it. I was really sure that I did. So I brought it home.
I had some anxiety over bringing home ANOTHER project when I have a lifetime supply of machines to fix and get stitching. I am on vacation this week. It was a week dedicated to sewing machine repair (Originally I was going to a Ray White class http://www.whitesewingcenter.com/repairclass.php ) so I figured I could relieve some anxiety and just get the stupid thing done.
The parts above belong in the machine and motor. The grease wicks are brand new. I think I will also put in new brushes.
Let's just hope it stitches....
Wednesday, October 24, 2012
Vacation
I went off to Pittsburgh on Friday of last week. Since the Ray White class was cancelled Andrea invited me for a visit. I think she invited me. I may have invited myself. In any case, we spent Saturday, Sunday and Monday doing what any self respecting sewing machine addicts would do. We sewed, played with sewing machines and hit the Goodwill stores. It was a most satisfying time for me. I only wish Pittsburgh were closer.
On Sunday, before our little trip to Falling Water, we worked on the pajamas. After our little trip to Falling Water we chased down a 201-2. Centennial.
Monday, July 9, 2012
Singer 201 tension issues continued
I changed the needle a couple of times. I even took a picture of the needle to look for a burr or a bend or whatever. NADA.
I adjusted the bobbin tension looser and that seemed to help some too. But not enough. Something was making the bobbin tension tighter or the top tension looser.
Then just before we had to go to Treadwell for the Stage Coach Run, I wondered about the top tension. The knob seemed to have a bit more "play" in it than the other machines in the shop (well the few that I checked....a couple of 201s, a 66, a 206, a 301) so I wondered if the spring was sprung. It did not look any different from another spring from a 201 but what the heck I switched it out. Then I put the tension back together and set it a bit tighter. It was hard comparing the lighter numbered dial to the black one......
but it looked like I had not turned the knob quite tight enough originally. I held the numbered dial against the spring and turned the knob tighter before I released the dial. I set it at 6 and the bobbin tension was fine. The top was a bit tight. I finally inched it down to 4 1/2 and it seemed ok by then . Even at top speed. So who knows what was really wrong? I did not take the bobbin case out again. It is a ROYAL PITA in the 201 though I am getting good at it. THANK YOU RAIN.
The machine seems to sew just fine now. I will try it out again and see if it is holding true. But I think the Centennial has to go........I can only have one 201-2 in the house. ......
Now, folks I am off to the shop again. I bought a new toggle switch at the Hardware store today during my lunch break (yes I should have been doing charts, but a sewing machine addict has to do what she has to do) and I am dying to see if it will fit.
Then just before we had to go to Treadwell for the Stage Coach Run, I wondered about the top tension. The knob seemed to have a bit more "play" in it than the other machines in the shop (well the few that I checked....a couple of 201s, a 66, a 206, a 301) so I wondered if the spring was sprung. It did not look any different from another spring from a 201 but what the heck I switched it out. Then I put the tension back together and set it a bit tighter. It was hard comparing the lighter numbered dial to the black one......
but it looked like I had not turned the knob quite tight enough originally. I held the numbered dial against the spring and turned the knob tighter before I released the dial. I set it at 6 and the bobbin tension was fine. The top was a bit tight. I finally inched it down to 4 1/2 and it seemed ok by then . Even at top speed. So who knows what was really wrong? I did not take the bobbin case out again. It is a ROYAL PITA in the 201 though I am getting good at it. THANK YOU RAIN.
The machine seems to sew just fine now. I will try it out again and see if it is holding true. But I think the Centennial has to go........I can only have one 201-2 in the house. ......
Now, folks I am off to the shop again. I bought a new toggle switch at the Hardware store today during my lunch break (yes I should have been doing charts, but a sewing machine addict has to do what she has to do) and I am dying to see if it will fit.
Saturday, May 26, 2012
How to pack a Sewing Machine for Shipping.
I love these machines so much. When I pack them, I pack to be sure that they arrive safely.
Notice that the spool pin on top is missing. It is tucked safely in the bag in a little baggie with the bobbins. I just realized that I did leave the light bulb in the machine. But I think it should be ok.
I start with making sure that the take up lever is down and that the presser foot is down. Then I wrap them up with bubble wrap and secure with painters tape. Painters tape is easier to take off and it doesn't mar the finish. (OK so now [May 28, 2012] I have learned from a very nice reader that in her experience IT DOES mar the finish....see comments below. DARN) I wrapped the little bag of goodies up and secured it to the bed of the machine as well.
I slit a cork and then wrapped tape around it. That way it would be tight enough to sit on the bobbin winder spool pin. I stuffed packing material between the cork and the machine so that should something hit the cork it would not give way into the machine.
Next I wrapped the stitch length lever with bubble wrap and secured it in place. The white stuff is polyester fill that came with a machine I bought on eBay.
I was going to wrap the machine with the batting but I don't have the cool saran wrap stuff to snug it all down next to the machine. So I stuffed some in the bed and wrapped the whole machine with bubble wrap. LOTS OF IT. I used a fair amount of tape to secure the bubble wrap.
And then I put this in a box with padding all around it. I actually triple boxed this machine. The inner box was a double box that came with the machine packed in the batting. It was a snug fit and I wanted to be sure that there was extra cushioning. I put that box into another and stuffed plastic grocery bags all around the inner box to make it a tight fit.
Sorry no pictures of boxes. What's the point?
It shipped today. I know it will travel today and tomorrow. Max is traveling east today and tomorrow. This machine is traveling west. I wonder if their paths will cross?
Notice that the spool pin on top is missing. It is tucked safely in the bag in a little baggie with the bobbins. I just realized that I did leave the light bulb in the machine. But I think it should be ok.
I start with making sure that the take up lever is down and that the presser foot is down. Then I wrap them up with bubble wrap and secure with painters tape. Painters tape is easier to take off and it doesn't mar the finish. (OK so now [May 28, 2012] I have learned from a very nice reader that in her experience IT DOES mar the finish....see comments below. DARN) I wrapped the little bag of goodies up and secured it to the bed of the machine as well.
I slit a cork and then wrapped tape around it. That way it would be tight enough to sit on the bobbin winder spool pin. I stuffed packing material between the cork and the machine so that should something hit the cork it would not give way into the machine.
Next I wrapped the stitch length lever with bubble wrap and secured it in place. The white stuff is polyester fill that came with a machine I bought on eBay.
I was going to wrap the machine with the batting but I don't have the cool saran wrap stuff to snug it all down next to the machine. So I stuffed some in the bed and wrapped the whole machine with bubble wrap. LOTS OF IT. I used a fair amount of tape to secure the bubble wrap.
And then I put this in a box with padding all around it. I actually triple boxed this machine. The inner box was a double box that came with the machine packed in the batting. It was a snug fit and I wanted to be sure that there was extra cushioning. I put that box into another and stuffed plastic grocery bags all around the inner box to make it a tight fit.
Sorry no pictures of boxes. What's the point?
It shipped today. I know it will travel today and tomorrow. Max is traveling east today and tomorrow. This machine is traveling west. I wonder if their paths will cross?
Saturday, April 21, 2012
To Market, to Market
Thursday, April 5, 2012
Anatomy of a 201/15-91 potted motor
This is what a 201 motor looks like once it has been removed from the machine.
Remove the housing by unscrewing the little screws and gently wiggle it away from the motor. Be careful.
Then you get this
Then the armature comes out
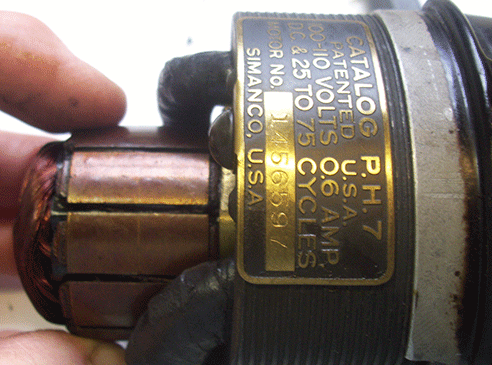
And it looks like this. This is a cleaned up version with the worm reattached for safe keeping' you can see the windings are a bit stained. Oh well. Also this armature had been varnished, I guess at the factory, and that brown glaze won't come off with cleaning.
When you look into the housing at the field coil it looks like this.To remove the field coil from the housing you have to remove the screws on each side.
Once the field coil has been removed from the housing it looks like this
If you were to gently pick this up and turn it around you would see this.
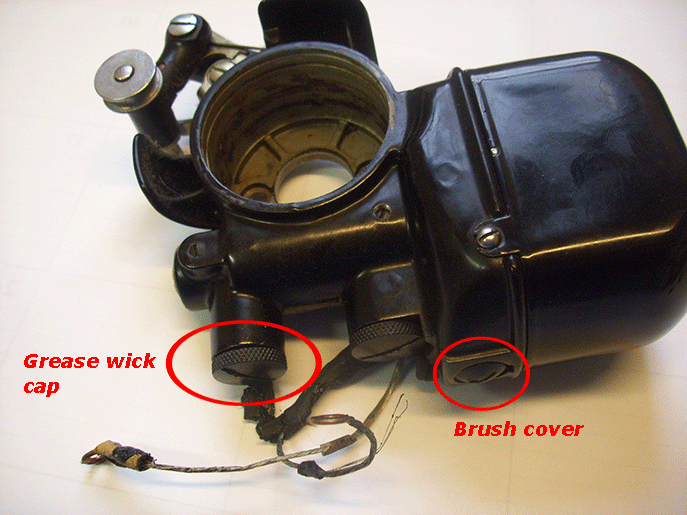
The grease wicks and brushes are removed to service the motor as well.
Brushes are carbon rectangles attached to springs. They glide into brush tubes and rest on the commutator
There is a very comprehensive tutorial on how to re-wire a potted motor on The Vintage Singer Sewing Machine Blog http://vssmb.blogspot.com/ Go there for all you need to know.
Stay tuned here for more fun with Kenmores
Subscribe to:
Posts (Atom)