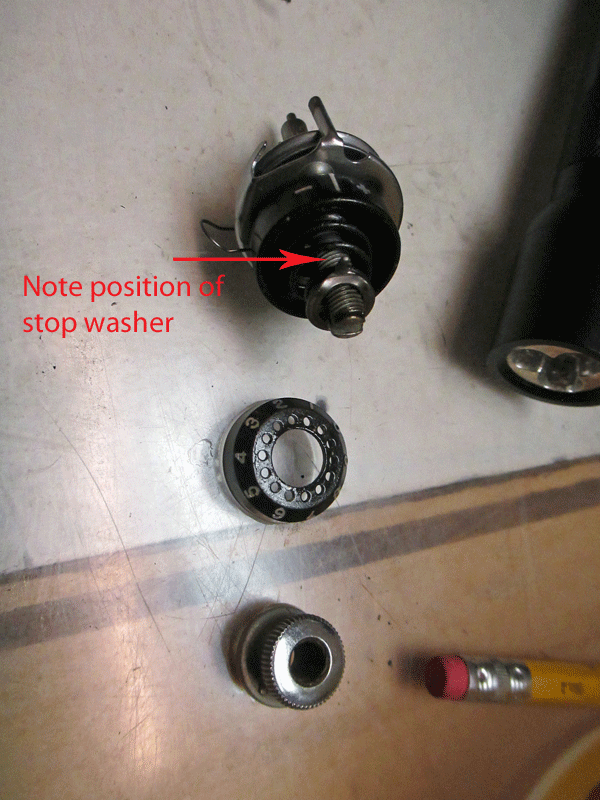
The 401/403/404 tension assemblies are a bit different from the 201/221/301. The thumb nut on the 201 merely screws on to the tension stud. On the 401 etc there are extra pieces. Who knows why the engineers changed the design. Boredom, maybe.
The 401 and 403 accept twin needles. Twin needles require two spools of thread feeding through the tension assembly and thus, into each needle. Hence, an additional disc is required for the added thread. I don't know if the 404 can take a twin needle. If not, Singer just used the same tension assembly as a cost effective measure. (Maybe?)
Start by locating the set screw inside the face plate on the machine. Loosen this. It is not necessary to remove it.
Once the set screw is loosened, the tension assembly should pull out. If it doesn't, try twisting it as you pull. It may be stuck with ages old dried oil.
A blog devoted to my vintage sewing machines and how I find them, fetch them and fix them.
Showing posts with label tension assembly. Show all posts
Saturday, May 4, 2013
Friday, April 26, 2013
Singer 201-2 Tension assembly
I have posted A LOT about the tension assembly. In all of those posts, I have not shown how the check spring fits into the tension stud. So here it is. I have removed the tension assembly from the machine. To do so, find the set screw just behind the thread guide and loosen it. If you are lucky the tension assembly will pull out. If it is stuck, loosen it with some tri flow or LW (liquid wrench) and wait.
The parts.
Please note that the tension release pin must be placed into the stud as shown. I recommend that you do so AFTER you have placed the check spring, tension discs and thread guard on the stud. You will be less likely to lose it.
Sandwich the tension discs (flats facing eachother) and the thread guard in between the coil of the check spring and the eyelet.
Place this onto the stud so that the tail of the check spring nestles into one of the grooves on the tension stud. If the check spring has too much bounce, you must move the tail to a different groove. If it doesn't have enough, move it to a groove the opposite way.
(Don't forget the tension release pin. It must go into the tension stud before you put the indicator on.)
Next comes the indicator. Place it on the stud with the flat side next to the thread guard.
Now place the tension spring onto the stud so that the first half coil of the spring straddles the lower half of the stud.
Make sure that the + and - are positioned on top and tighten the set screw.
The parts.
Please note that the tension release pin must be placed into the stud as shown. I recommend that you do so AFTER you have placed the check spring, tension discs and thread guard on the stud. You will be less likely to lose it.
![]() |
| tail of the check spring |
(Don't forget the tension release pin. It must go into the tension stud before you put the indicator on.)
Now place the tension spring onto the stud so that the first half coil of the spring straddles the lower half of the stud.
Next comes the stop washer positioned on the stud so that the extension sits above the tension stud.
Now place the numbered dial on the stud positioned so that the Number 2 is oppositethe stop washer extension.
Compress the numbered dial against the spring as you thread the thumb nut onto the tension stud with the pin toward the numbered dial. Guide the pin into one of the holes on the numbered dial. Place the whole assembly on the machine, making sure that the extension on the thread guard fits into the hole on the machine. The presser foot must be DOWN when you out the tension assembly back on the machine. Position the check spring so that it rests on the extension on the left side of the thread guide. Make sure that the + and - are positioned on top and tighten the set screw.
Tuesday, January 1, 2013
Don't be afraid of the.....tension assembly
People seem to fear dismantling a tension assembly. I am not sure why. Singer tension assemblies are easy. They are pretty much the same among the older machines and it can't get much easier than the older ones with no numbered dial. When I went back out to the toasty warm shop I had planned to shine up the machine and take photos. I had forgotten about the tension assembly.
Now some folks advise taking dental floss and cleaning the tension discs by flossing between them with it. I just don't see how you can get an assembly really clean like that. I mean how would flossing the tension discs get rid of that dust and lint?
I take photos as I go along. By now I am fairly familiar with this Singer tension assembly. I took some photos just the same.
I like seeing all the parts in the denatured alcohol bath. Something about it makes me happy.
This makes me happiest. I have not stitch tested the machine. Only Wrigley made it to the shop. Wilson is a bit timid traipsing through the snow to the shop. I was worried that he might be waiting outside for me. It is getting colder and he is a poodle after all. No undercoat. He's also a pretty skinny guy. I had to come in the house.
But not before I took some photos of the finished product.
Now some folks advise taking dental floss and cleaning the tension discs by flossing between them with it. I just don't see how you can get an assembly really clean like that. I mean how would flossing the tension discs get rid of that dust and lint?
I take photos as I go along. By now I am fairly familiar with this Singer tension assembly. I took some photos just the same.
I like seeing all the parts in the denatured alcohol bath. Something about it makes me happy.
This makes me happiest. I have not stitch tested the machine. Only Wrigley made it to the shop. Wilson is a bit timid traipsing through the snow to the shop. I was worried that he might be waiting outside for me. It is getting colder and he is a poodle after all. No undercoat. He's also a pretty skinny guy. I had to come in the house.
But not before I took some photos of the finished product.
Saturday, August 11, 2012
Kenmore 158 tension assembly
I promised a reader that I would post a tutorial about the Kenmore 158 tension assembly. As best as I can tell, the 158.1701 (the assembly in question) looks the same or similar to this one.
Oh my, I had no idea how dirty it was. This is from a 158.1803.
The first thing to do is take the whole kitnkaboodle out of the machine.
Loosen the set screw but don't take the screw out. It is tiny and you might lose it. It will release the assembly without coming all the way out.
Next remove the hex screw from the face of the tension assembly
The indicator ring will come out as well
Then you will see this
You will have to pry this out. You can see that when you replace it, it will only fit ONE way onto the stud.
Next you will see the wavy washer.
This should fall right out when you flip the assembly over to get this:
Pull this off and take note of the notch on the inside. (I am not the first person to take this tension assembly apart)
This is what you get next. The washer is quite tight and the stop washer is even tighter.
To get to the check spring you have to loosen the set screw.
You have to remove the washer and the stop washer next. Or you could do this before you release the check spring. Might be easier. Check out the position of the stop washer tab. You want it like this when you re-assemble
The washer comes off readily. Pry the stop washer off gently. You then get this. The cogged "nut" willscrew off easily. Then take off the spring and the tension release pin stop washer.
Note the position of the "nibs" (red arrow) on the tension release pin stop washer. Don't put it in backwards. It won't work. Ask me how I know.
Tension release pin
Now I admit, I did not take this whole thing apart here. I just spread things out a bit so that you can see how they go. There are three tension discs. One is flat. The other two are concave. Make sure that the concave discs "kiss" the flat one between eachother with the concave sides facing the flat discs. I think that you can see this here. If your machine does not accept a twin needle you will only have two discs and they should "kiss' eachother with the concave sides in.
A and E are the outer two discs.
If you want to change the amount of "spring" in the check spring, you must move it one way or the other in the stud. The short end of the spring fits into one of the slots in the stud. Can't see it so well here. Sorry.
You want things position about like this before you put the casing back on over the check spring
If it doesn't work quite the way you like it, fiddle with it. Move the check spring tail one "notch" on the stud and see what happens.
Replace the casing making sure that you line it up with the tab on the back of the disc
And make sure that the check spring sits in the indentation in the front of the disc.
Make sure that you tighten the set screw adequately. Otherwise the whole assembly will twist and you will be very sad. It means starting over, basically.
Put the tension release pin in next. It will really only go in one way. The head is the part that comes into contact with the tension release pin washer which goes on next
Next put the spring in
Then the cogged screw. Just get it started.
The Stop washer goes next. It is snug. Don't force it. It must go all the way to the threads. The little tab should line up at the top and should match one of the cogs on the screw.
Next comes the little washer and then the numbered dial.
When you put the numbered dial on, be sure that little tab on the inside is positioned to the RIGHT of the stop washer tab. It won't twist far enough otherwise.
Then comes the wavy washer, the tabbed washer and the indicator ring
The tabbed washer sits on top of the wavy washer snugly. Be sure it is positioned firmly. It only goes one way. Lucky us
Next put on the indicator ring. It has to fit one way or the other. The tabs on the washer must fitin the indentations on the ring. Line up the white mark as close to zero as you can.(PS the white mark is on the opposite side of the indentations)
Replace the screw and tighten.
When replacing the tension assembly on the machine you will need the ring that goes between the tension assembly and the machine. It has a serrated notch where a pin from the tension assembly fits
Put the whole assembly back in the machine, tighten the set screw and stitch it in. WHEW
I marked the set screw scar so that I could re- align it. You can see that I have had the assembly out a couple of times during this process today. New set screw scars.
I suppose I could have put that white indicator on the top. This project was a bit of a challenge. I don't think it matters where it is.
The first thing to do is take the whole kitnkaboodle out of the machine.
Loosen the set screw but don't take the screw out. It is tiny and you might lose it. It will release the assembly without coming all the way out.
Next remove the hex screw from the face of the tension assembly
The indicator ring will come out as well
Then you will see this
You will have to pry this out. You can see that when you replace it, it will only fit ONE way onto the stud.
Next you will see the wavy washer.
This should fall right out when you flip the assembly over to get this:
Pull this off and take note of the notch on the inside. (I am not the first person to take this tension assembly apart)
This is what you get next. The washer is quite tight and the stop washer is even tighter.
To get to the check spring you have to loosen the set screw.
You have to remove the washer and the stop washer next. Or you could do this before you release the check spring. Might be easier. Check out the position of the stop washer tab. You want it like this when you re-assemble
The washer comes off readily. Pry the stop washer off gently. You then get this. The cogged "nut" willscrew off easily. Then take off the spring and the tension release pin stop washer.
Note the position of the "nibs" (red arrow) on the tension release pin stop washer. Don't put it in backwards. It won't work. Ask me how I know.
Tension release pin
Now I admit, I did not take this whole thing apart here. I just spread things out a bit so that you can see how they go. There are three tension discs. One is flat. The other two are concave. Make sure that the concave discs "kiss" the flat one between eachother with the concave sides facing the flat discs. I think that you can see this here. If your machine does not accept a twin needle you will only have two discs and they should "kiss' eachother with the concave sides in.
If you want to change the amount of "spring" in the check spring, you must move it one way or the other in the stud. The short end of the spring fits into one of the slots in the stud. Can't see it so well here. Sorry.
If it doesn't work quite the way you like it, fiddle with it. Move the check spring tail one "notch" on the stud and see what happens.
Replace the casing making sure that you line it up with the tab on the back of the disc
And make sure that the check spring sits in the indentation in the front of the disc.
Make sure that you tighten the set screw adequately. Otherwise the whole assembly will twist and you will be very sad. It means starting over, basically.
Put the tension release pin in next. It will really only go in one way. The head is the part that comes into contact with the tension release pin washer which goes on next
Next put the spring in
Then the cogged screw. Just get it started.
The Stop washer goes next. It is snug. Don't force it. It must go all the way to the threads. The little tab should line up at the top and should match one of the cogs on the screw.
Next comes the little washer and then the numbered dial.
When you put the numbered dial on, be sure that little tab on the inside is positioned to the RIGHT of the stop washer tab. It won't twist far enough otherwise.
Then comes the wavy washer, the tabbed washer and the indicator ring
Next put on the indicator ring. It has to fit one way or the other. The tabs on the washer must fitin the indentations on the ring. Line up the white mark as close to zero as you can.(PS the white mark is on the opposite side of the indentations)
Replace the screw and tighten.
When replacing the tension assembly on the machine you will need the ring that goes between the tension assembly and the machine. It has a serrated notch where a pin from the tension assembly fits
Put the whole assembly back in the machine, tighten the set screw and stitch it in. WHEW
I marked the set screw scar so that I could re- align it. You can see that I have had the assembly out a couple of times during this process today. New set screw scars.
I suppose I could have put that white indicator on the top. This project was a bit of a challenge. I don't think it matters where it is.
Subscribe to:
Posts (Atom)