Wednesday, September 28, 2011
Self control
Today I drove to the middle of no where, really. I live in rural New York and today I drove even further into rural NY. There was a Necchi Super Nova Julia 534 advertised on Craigslist and I drove to the middle of a state forest to look at it. I knew that the wiring was bad and that the motor did not fire up. I still went. It took me about an hour and I did drive over some flood damaged roads and some dirt roads. The garmin wanted me to take a questionable route, so I followed the Gazeteer. Originally the land was a farm, now it is a forest. I love nature.
The machine turned freely. The wiring was a mess. The power cord looked unique with four pins. There was no way to salvage it since it is a molded piece. I knew that I did not want to bring home another project. Not for forty bucks. She would not budge on her price. eBay influence I am certain. So, if she does list it on eBay I will watch it. Would I take the 35 mile trek out there again to buy it? Sure for five bucks.
Now. I know nothing about Necchi.. Maybe forty bucks is a deal for a non working vintage Necchi Super Nova Julia 534. But it isn't to me. Steven is proud of me. "Way to show some self control, honey."
Tuesday, September 27, 2011
Singer 403 tension assembly


If you want a very good, one picture description of how to re-assemble this, go to the files in http://groups.yahoo.com/group/vintagesingers/ and look under 401 tension assembly. Very nicely done. I did not take the stud and the tension release pin out when I cleaned these parts. Probably I should have.....
Do you wonder what the blue tape is all about? At first I did not realize that the face plate simply lifted off.
Monday, September 26, 2011
I can't help it. I am so excited!!! T oday I got an email from A. She sold me the Elias Howe. She offered her Wheeler and Wilson # 8 to me and I said YES. Of course this does not compare to when Steven got down on his knee and asked me to marry him, of course not..... Still it is a very exciting day. Pictures when I get her in a few weeks. WOOOOO HOOOO a Wheeler and Wilson!!!!!!
Sunday, September 25, 2011
Singer 403..The hook stayed home
I worked on the 403 today and decided NOT to take out the hook. There are instructions on vintage singers but I just did not have the gumption to take it out. If it doesn't stitch I will accept the challenge, but maybe at the Ray White class.
Fortunately the throat plate lever on this machine worked perfectly so it just popped right off. The feed dogs came out readily, as well. But I did not know how to remove the bobbin case. I guess I did not do it on the 401 when I cleaned her out, or else, I forgot. That would not surprise me.
I referred to the 401 manual. To remove the bobbin case, all you have to do is slip the position bracket to the right and lift out the bobbin case.

I did that and cleaned and scrubbed and scraped all the crud out from in and around the hook. But I left that hook alone. I never noticed that piece of red lint in the bobbin case. These photos really magnify detail. I did notice it when I was cleaning the bobbin case:
 I was able to remove it with the help of a dental pick that my wonderful dental hygienist gave to me. What a fine instrument that is. Perfect for getting into these very tight clearances.
I imagine the machine would not have stitched well with that lint trapped in there.
 Speaking of clearances, next on my list of tools to purchase is a set of feeler gauges.
I am now the lucky "winner" of a manual and some accessories for the 403. Stayed up to watch the countdown on eBay. Now I can go to bed.
Fortunately the throat plate lever on this machine worked perfectly so it just popped right off. The feed dogs came out readily, as well. But I did not know how to remove the bobbin case. I guess I did not do it on the 401 when I cleaned her out, or else, I forgot. That would not surprise me.
I referred to the 401 manual. To remove the bobbin case, all you have to do is slip the position bracket to the right and lift out the bobbin case.

I did that and cleaned and scrubbed and scraped all the crud out from in and around the hook. But I left that hook alone. I never noticed that piece of red lint in the bobbin case. These photos really magnify detail. I did notice it when I was cleaning the bobbin case:

I imagine the machine would not have stitched well with that lint trapped in there.

I am now the lucky "winner" of a manual and some accessories for the 403. Stayed up to watch the countdown on eBay. Now I can go to bed.
Saturday, September 24, 2011
Self made wire ring connectors.
I am offering this information with the intent of sharing. I am not a professional and you can try these suggestions totally at your own risk.
As I mentioned previously, I saw this idea on My Sewing Machine Addiction (http://mysewingmachineaddiction.blogspot.com/). She made her own ring connectors from the end of the wire. I thought I would try it.
First I scored the insulation between the two wires:
 So that I could pull the two wires apart a little bit:
 And then as far as I think I need to separate it:
 Then I estimated about how big the ring needed to be:

And stripped off that much insulation:
 Then I twisted the wires to make a "braid" and wound that around a pencil end:
 To make a ring:
 Then I twist that end around to make a nice tidy mechanical connection.
 I recommend checking to make sure that your ring fits.
If it doesn't, you can shape it with the pencil again. Now time to solder.
 Remember to heat the wire and let the solder run onto the wire and saturate the joint and coat the whole ring. Heat rises, gravity helps the solder run into the joint.
 I forgot to put the shrink wrap on before I made the ring. I recommend in a true application, you not forget. Be sure to position the shrink wrap far away from the heat source so it doesn't shrink prematurely.


As I mentioned previously, I saw this idea on My Sewing Machine Addiction (http://mysewingmachineaddiction.blogspot.com/). She made her own ring connectors from the end of the wire. I thought I would try it.
First I scored the insulation between the two wires:


And stripped off that much insulation:


I understand that shrink wrap is not great protection if you need it for abrasion protection. I think in this application it should be fine.

Thursday, September 22, 2011
Singer 403


Wednesday, September 21, 2011
Soldering connectors
I am home schooled in soldering. Steve showed me how he solders copper pipes (not the same) and how he has soldered wires together using the same flux and solder that he uses for copper pipes. Not exactly correct. I read on the vintagesingers yahoo group (http://groups.yahoo.com/group/vintagesingers/) a wonderful post by N. Rain Noe (http://vssmb.blogspot.com/) on re wiring a 201 motor. Look in the files for Motor rewiring. I simply bought all the supplies he suggested and practiced A LOT. I studied various sites on the internet and practiced some more. Soldering is not hard. It is tedious. Patience is the key. The most important thing to remember is to heat the WIRE and let it melt the solder. You can create a joint by touching the solder to the soldering iron and dripping it onto the wire, but that is considered a cold joint and not strong, nor correct
About wire. Gauge refers to the heft of the wire, or its thickness. 12 is heavier than 14 which is heavier than 16 which is heavier than 18. By the way this is not true for sewing machine needles, is it? But it is true for needles I have used to give injections to human beings. Go figure.
SPT refers to the insulation. I don't have a clue what it stands for but with insulation rating the higher number, the thicker the insulation. Therefore, SPT-2 is thicker than SPT-1. For most sewing machine wiring repair, if you can use the SPT-2 it is probably better. If you don't need protection from abrasion, the SPT-1 is adequate. You can find it all somewhere out there on the internet with the help of GOOGLE. Or just order it from Sew Classic, and buy it by the foot.
http://shop.sew-classic.com/Motors-and-Motor-Parts_c21.htm
I have used common 16 gauge SPT -2 wire to re wire lights and foot pedals. Truly I like the 18 gauge wire much better. It is easier to handle and the same "weight" as original wire on the singers. Some people think that 16 gauge is better, and that is fine. I just like the 18 gauge stuff. Again, if you can, use the SPT-2 insulation.
About safety. The soldering iron is hot and the solder is hot. Wear eye protection and work in a well ventilated area. This stuff has lead in it. Keep your work area un-cluttered and watch how the iron is positioned. For me it is all about positioning. I don't start to solder until I am all set up. Even then I have to watch what I am doing.
The first thing I do is gather my tools and plug in the iron and wet the little sponge that fits in the helping hands base. I have been using a Weller 25 watt soldering iron that I bought for 20 bucks. It has been just fine. I did buy an iron with higher power and a rheostat at Radio Shack, on the advice of another customer shopping there that day. I don't like it as well. I did use it for today's project and I like it a little better. I think that I should have saved my money and stuck with the Weller.
 |
| Weller soldering iron, "helping hands," 37/63 resin core solder, crimping/stripping tool |
I do think that crimping is a good, certainly quick, method for installing new connectors. Since I cannot crimp, I solder. I remove the little insulators from the connector and turn them around and use them after I have soldered the joint.
 | ||||
| AWG= American Wire Gauge |
 |
| Gently squeeze the plastic part of the connector to loosen it. Be very gentle and squeeze only the plastic part. |
 |
| This demonstrates that the insulator is coming off. I hold the metal ring in the pliers and twist the plastic off with my fingers. |
Then I stripped the insulation from the wire.

It is important that you don't break the wires when you strip the insulation. The crimping/stripping tool is calibrated, I use the largest hole that will get the job done and not cut the wire. I do have to grip well and pull hard, but the insulation comes off quite nicely. For this particular project, the insulation does not need to be stripped this long but you get the idea.


When soldering, it is important to have clean wire and clean soldering iron. There is a tip cleaner product, which I have not purchased. Instead I heat the iron and "tin" the tip, meaning I melt solder all over the end of the iron. I then rub the tip on the damp sponge in the base of the HH stand. This might be more expensive than tip cleaner, solder isn't cheap and this wastes solder. Next trip to town, I will check out tip cleaner
Here I am holding the solder on the wire itself and waiting for the hot wire to melt the solder. It happens quick, once it happens. Obviously it hasn't happened in this photo. I used the self timer on the camera for this shot, clever me, and of course with all of that setup the wire wasn't hot enough.
Don't disturb the connection until the solder has cooled. Once it is cooled it is strong like bull and you can do anything to it , almost.

I am not a professional sewing machine mechanic but I am mighty pleased with this outcome. If you notice, the connectors are not identical and I am not going to tell you why, except that it has to do with memory, blue insulator and wire that is shorter than it was originally. ( # 22-16 AWG is irrelevant in this photo. )

Coming up in a future post, how to make a terminal ring out of the wire itself. It's fun and EASY.
Tuesday, September 20, 2011
Singer 128 Tension assembly

This piece is the equivalent of the set screw on the 66, I believe.

Check spring I n this photo you can see that the check spring is sitting under the thread guide. You want the check spring to be positioned between the two indentations on the opening in the machine

More like this.

I could not exactly remember so today (1/31/12) I got the machine out and took it apart again and figured out what I did.
I took the stud and the check spring out and looked at them. I noticed that the check spring has a smaller loop at its proximal end (the end that is nearest the body of the machine) That small loop needs to sit on the proximal end of the stud so that when the stud is tightened the spring is held fast and able to bounce in between the two indentations as seen above.


Inevitably as I tightened the stud, the check spring would tighten in the same direction and end up wrong wrong wrong. So I fiddled. I loosened the stud and pulled on the check spring very gently:

The next photos are from the original post. I can't change them at this point.
The tension discs are placed so that the convex sides face each other. I tried to get a good shot of them.......Not in focus, I apologize.

Tension discs in place. They are clean, just stained. (Sort of like my fingernails)

Next comes the tension spring.


Here you can see how the check spring should be positioned at about nine thirty. It must be correct because the stitches are just so nice. I just fiddled with it (see above) and the stud until it looked like the tension assembly on my 27.

This post has been updated from the original on January 31, 2012 thanks to a question from Carol from vintagesingers yahoo group. I appreciate her question because it makes this post much more complete. I also had a chance to fool around, some more, with Adobe Photoshop Elements 10. Software that came with no manual. Jeez.
Monday, September 19, 2011
A Window with a View

Sunday, September 18, 2011
Sometimes you gotta let go.
Sometime last winter I googled vintage sewing machine and landed on sewing-machines.blogspot.com Now, those of you who are not sewing machine fanatics might not appreciate the sentiment expressed by Mr. Lamoureaux, but I laughed out loud.
http://sewing-machines.blogspot.com/2010/01/sometimes-you-gotta-let-go.html
I am somewhere between phase four and phase five. I have yet to sell my computerized sewing machine, I doubt that I will, but I won't fix it again.

Next Project: Singer 128
 |
| |
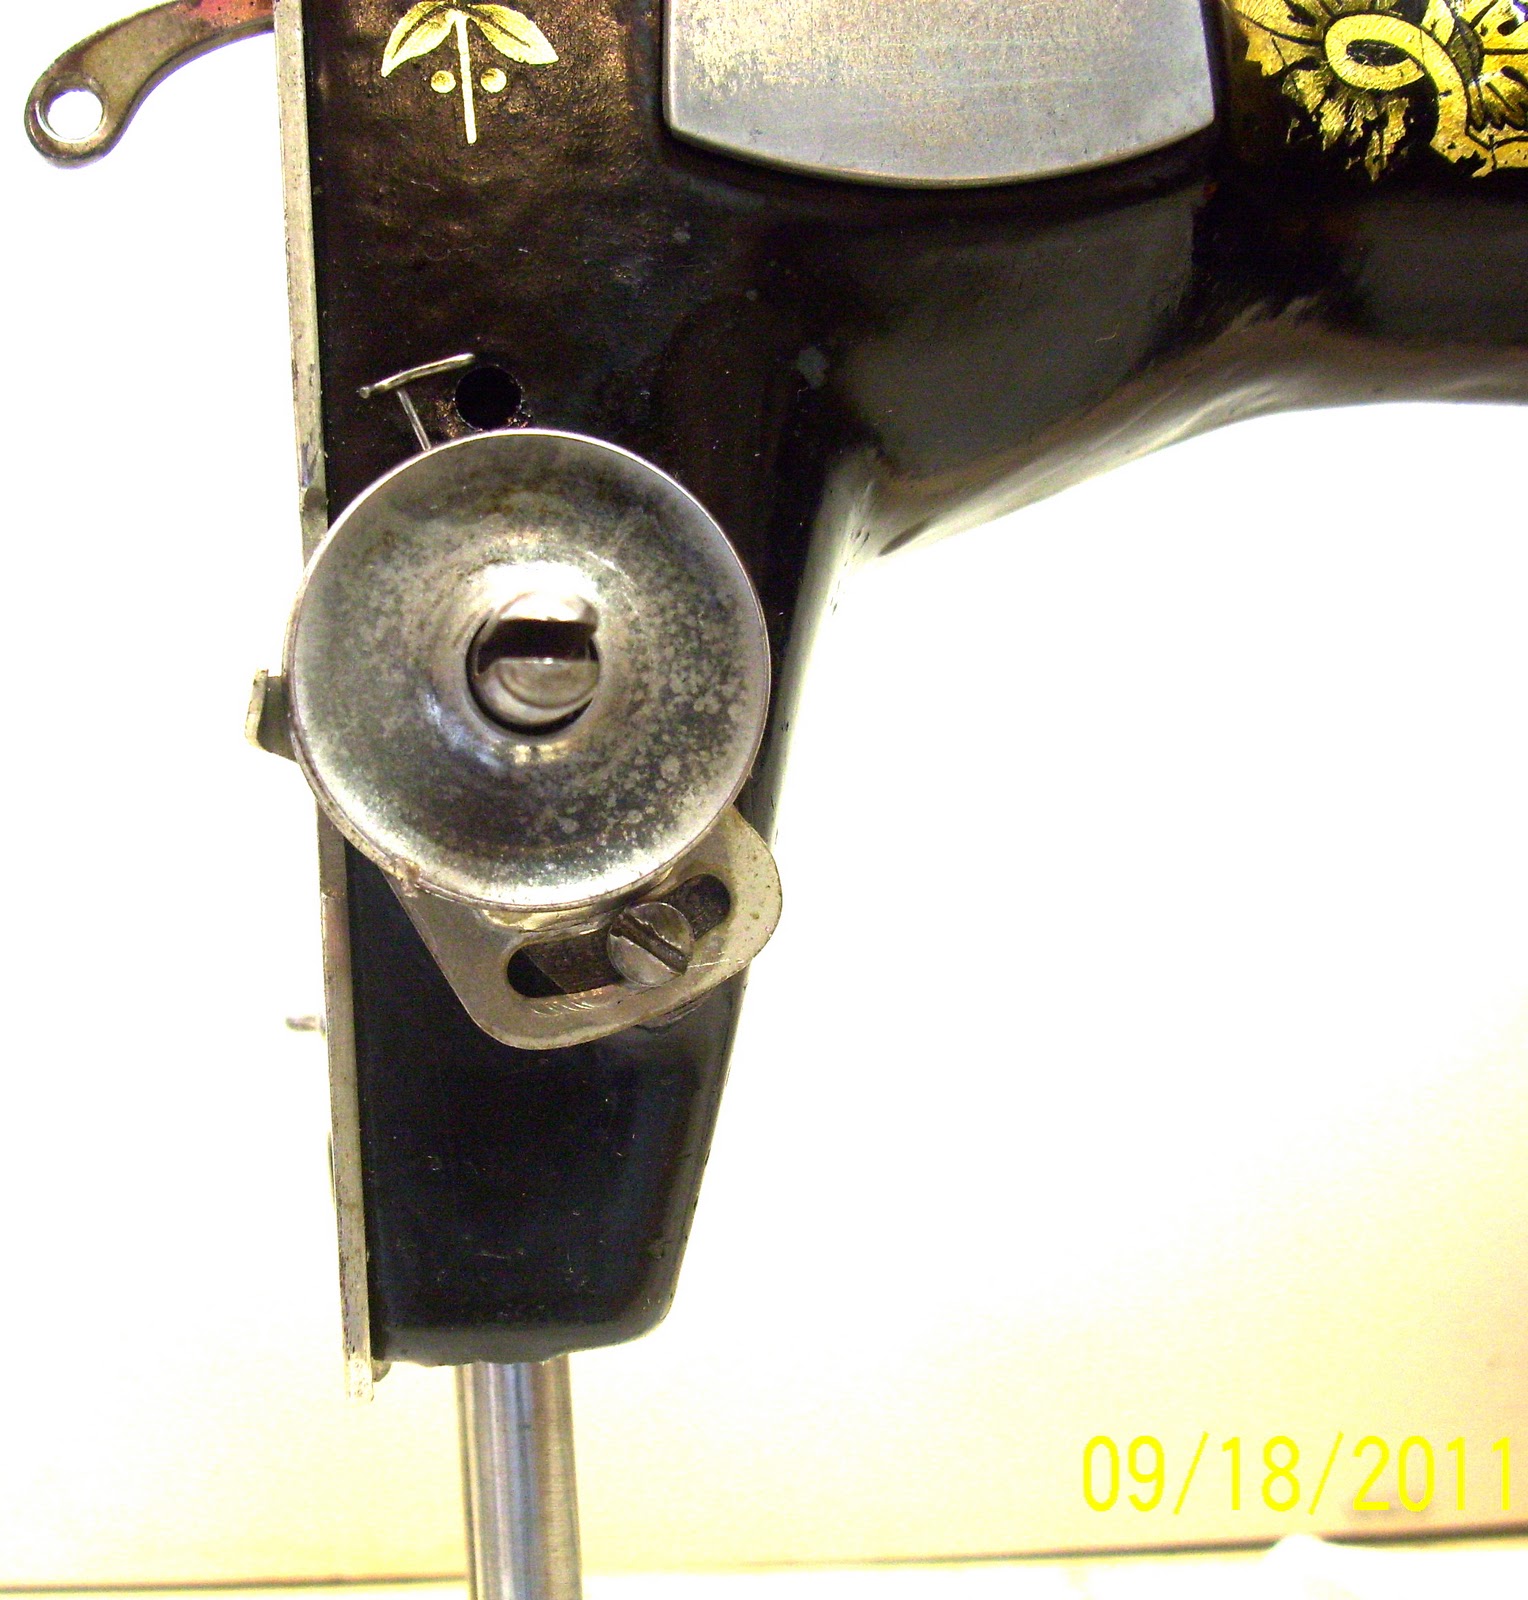
I never can remember the difference between the 27 and 28 and the 127 and 128. There is a great website to help us identify our older model Singer: www.sandman-collectibles.com/id-singer-machines.htm This, as it turns out, is a 128. The 127 is the full size version of this 3/4 size machine. The difference between the 27/28 and the 127/128 is the position of the bobbin winder. The 27/28 has the bobbin winder low, near the bed of the machine. The 127/128 has the bobbin winder high, as in this example. I have a Fiddle Bed with these same decals, further emphasizing that decals do not denote anything but decoration.


I used Dr.Bronner's almond oil castile soap for this clean up. Then I rinsed with sewing machine oil and rubbed gently but for a very long time. I hate to put the bobbin winder back on. This is the prettiest part of the machine. I'll bet the bobbin winder protected it.
If I could mount the bobbin winder low, I would. I don't think that I can.


Subscribe to:
Posts (Atom)