Friday, October 31, 2014

Singer 201D.

The Singer Sewing Machine Factory at Wittenberge was constructed in 1903.   Thirty six years later, most of the factory was devoted to military production.  In 1946 the factory was stripped by the Russians.   http://www.singersewinginfo.co.uk/wittenberge/

I would have to conclude that this machine was made sometime, therefore, before 1946.
I almost didn't get it.  A woman contacted me via the blog and offered this machine to me.  Since she was in metropolitan NY I knew that I could not fetch it.  I suggested that she contact Rain of The vintage Singer Sewing Machine Blog.  I forwarded her email to him and he offered to fetch it for me if I wanted it.  There's a no brainer.  Since Rain sometimes travels upstate a bit, we made arrangements to meet so that I could fetch it from him.  Lucky me.

I like the machine.  Sure, it's just another 201 but I don't have a badge like this on any of my other machines.  Come to think of it, I think the only Centennial I have is the 201K that is about to be re-homed (I hope, I hope).  Somehow, the Centennial Badge doesn't hold the same mystique that this one holds. 

I am almost ready to test it.  I cleaned the gears (oh ICK)


 and freed up the Bobbin Winder and the feed dog drop.   A spoke wheel does fit, sort of.  The bobbin winder doesn't work unless there is a rubber band  installed on the wheel.  You can see it in the photo.  I like a spoked wheel on a treadle machine; more heft.  Plus, it is prettier.

The other gears were not nearly as awful.  A little Kero and new Triflow grease and they are good to go. 

The hook and bobbin case require attention.  That is a job for first thing in the morning.  Right after I light  fires in the shop and the sewing loft.  Winter arrives tomorrow.  Drat.

Never Can Say Goodbye


Perhaps, if I am lucky, this 201K will find a new home soon.


I try not to be too sentimental.  I bought this machine almost two years ago.  Max and I were visiting Mom.  I was coveting a 201 I could treadle.  I found it on Asheville Craigslist.  Max didn't really roll his eyes when I told him about going up to West Asheville to fetch it. He went along willingly.

"Let's go to Malaprop's Book Store while we are there."  http://www.malaprops.com/  We even had lunch.

I had no intention of ever letting this machine go.   This  past summer I acquired a 201D made at the Wittenberge factory.  It isn't in much better cosmetic shape.  It might be more unique, though I doubt rare.  The stitch length plate is metric.  So I decided that of the two, the 201K was the one to go.

I put it in the cute, little, wooden treadle stand and tried it out.  Smooth machine with a nice stitch.


Wednesday, October 29, 2014

HUMMMMMMMMMMM

The Necchi Foot controller did not work.  I installed a new, after market, and generic foot  controller. (Oxford comma, corrected). It came with my South River parts.

I was sewing along happily but noticed a hum despite no pressure on the controller.  It sure sounded like a sewing machine motor hum.  I thought, perhaps, it might be the fluorescent (shoot I should have left fluorescent misspelled for someone I know)  lights.  I turned them off.  There are four in the sewing loft.

I still heard the hum.

I leaned way into the Necchi.  It most certainly was the motor.  Drat.  I unplugged it and picked up the foot controller.  It was hot.  Very hot. Extremely hot.  Too hot to handle.  Double drat.

I did not want to mess with fixing a foot controller.  I wanted to sew.  Triple Drat.

I found a Singer button foot controller, removed it's wires and took the "new" controller off of the Necchi. It had cooled by this time.

As soon as I looked at it I understood the problem.  The connection was not, well, disconnecting despite my removing my foot COMPLETELY from the controller each time I stopped sewing.  The dang thing is crap; poorly made.  I was unable to make any correction or adjustment.


The Singer foot controller works well.  It is a bit stiff.  Maybe I will fix that sometime but not now.  I want to sew. 

Monday, October 27, 2014

DNP and OBW

The world is now full of acronyms.  POTUS  SCOTUS  DH DD DS DGD  WTF LOL TTYL.  I have no idea if, in the quilting world, DNP is an accepted term.  I use it because I prefer typing DNP instead of Disappearing Nine Patch.  One could, I suppose, use D9P.  OBW is not a character from Star Wars.  It stands for One Block Wonder.

I finished a scrap DNP quilt top this weekend.  I need to sew on borders and then it will be ready to quilt.

Poor lighting clouds  this photo.  Here it is before I sewed it all together. I had a time figuring out the pattern.  I think it will be ok with a border and after it is quilted.  Clearly I had NO PLAN.  I merely wanted to use up some fabric.  I accomplished that.

Steven looked at the design wall.  He scrutinized and squinted and said:

"Your eye does try to find a pattern, doesn't it?"  I agreed.  That's the problem with using so many different fabrics with no real intent.  We will see how it "quilts out."

Once I finally finished stitching all of these blocks together to create the quilt top, I set it aside.  I was anxious to fuss with the OBW I started this summer.

I bought the fabric on line and discovered that what I thought was a 24 inch repeat was more like a 12 inch repeat.  I used the fabric anyway.  It was for a class at the Zoo.  OBWs require  a lot of cutting. It is a bit tedious.  The result should be more like a Kaleidoscope.  Because of the short repeat, I think mine was less "artistic."  Still, I persevered.  I grouped the hexagons by dominant color and set to work.  ( All of these hexagons fit into one, small plastic storage box.  There they sat for months.  Until yesterday. )

I started with the whitest blocks and worked outward.  More tweaking, but I think I almost have the design.  Just in time for Christmas.

I bought some fabric at Sauder's.  It has a bona fide 25 inch repeat.  I have plenty of that for a queen.  Oh my aching wrist. 
(Sorry that the photo is so small.  I lifted it from their website. )


Friday, October 24, 2014

Amish Country

 When ten hours and 500 miles separates friends, what makes sense?  Meet half way.  Andrea and I did just that when we met this past Saturday in Lancaster County, PA.

"Home" for us was the Walnut Inn Bed and Breakfast; Beth, our warm, wonderful, and soulful Innkeeper.  Guess what?  She sews.  It was absolutely NO PROBLEM for Andrea and me to pull out machines out Monday night and whip up four new pillows for her couch  Trust me.  It needed COLOR.

Tuesday we headed over to Intercourse for the true tourist trap: Kitchen Kettle Village.  From there we went to Weaver's Dry Goods in Denver.

"It's thirty minutes away," navigator Andrea advised.

"That's fine, what else are we going to do?"  said I as I waited for the glow plug on the TDI to turn off.

Monday we had decided  that Weaver's would be THE PLACE TO GO when we saw a yard stick in Hannah's Quilts, a GENUINE, AUTHENTIC Amish quilt shop.
It was definitely authentic.  "Hannah" greeted us cordially.  She was dressed in traditional Amish garb and the shop was part of the home.  There were other customers shopping but Hannah took the time to go through each of the hanging quilts and show us each one.  She explained that one woman quilts each quilt because the stitches would be different if many women worked on the same quilt.  While she was off tending to the other customers we investigated the work area.  It looked genuine and authentic (translation like my sewing space). Hannah outlines the design on the quilt and then the quilt goes off to the quilter.  Once completed, the quilt comes back to the shop for binding.  She had  a Juki Industrial machine in one corner, by the window.  I looked for the "tail" (electrical cord) but instead found hoses and compressor connections.  Hannah confirmed that the power source was, indeed, compressed air.

When we arrived at Weaver's... more authentic Amish.
 The store, though, wasn't much different from Walmart as far as I could tell. There was cheap Chinese stuff everywhere.   Andrea and I thought it might be different.  Sigh. We sure as heck didn't find the cool, authentic yardstick.  I was bummed.

Sunday, October 12, 2014

Morning Moon


MORE NECCHI TALES: Hand Wheel

Once I  determined that the SuperNova's power plant is healthy, I decided to give the mechanical a look see.  It really is pretty clean.  This is a pleasant surprise.

I removed the hand wheel, following the directions I downloaded from, yup, you guessed it, the Necchi Yahoo group.

First I loosened the belt, but that you already knew about since I did it in a previous post.  Then  I removed the clutch knob from the hand wheel.

I removed one screw, but found that you don't have to remove the screws at all.  Just loosen them.  That way they won't drop to the floor, or worse, get lost.

Turn the knob left loosey and unscrew it all the way off.

The stop washer is integral to this piece.  See how the stop washer fits into a notch in the shaft?
This slipped right off along with a couple of washers.
The hand wheel itself slipped off next.  I have never seen a wick inside a hand wheel.  Ever.

Upon Andrea's advice, I removed the wick,
The oil wick channel wasn't awful, but it was dirty.

I soaked the wick in alcohol to clean it up. (This was not an original idea.  Andrea told me to do it). Once every thing was clean I reassembled the hand wheel.  Thank goodness I took photos, so that I could figure out where the washers went.

Note the position of the bobbin winder.  This is significant.  The belt is a generic, lug, belt.  While it is the correct diameter, the belt is too wide.  It rides above the belt channel in the hand wheel and interferes with the functioning of the bobbin winder.  I can't wind a bobbin.  Bummer. 
I think I will wander on over to Ed Lamoureux's blog  http://sewing-machines.blogspot.com/ and ask him about the belt. 


Wednesday, October 8, 2014

More Necchi Tales: Needle Plate

The circular needle plate fascinates me.  Unfortunately it looked as if it were broken.  The central stud is loose.  When the presser foot was down the needle plate would rise up opposite the foot.  I feared that a part was missing. 
According to the manual:


So I looked under the plate:

And I fixed it.

Maybe this machine will work out after all.

Sunday, October 5, 2014

Necchi Tales

The folks over at Treadle On call electric machines, machines with tails.  The electric cord is the tail.  That piece of information vaguely relates to this post.  I didn't really work on the electrical of the Necchi today.  I did, however, take some photos to demonstrate why I was having so much trouble with the power cord that came with the Necchi (NPC)

These photos are demonstration only. 

When I took the NCP apart, the wires were lying in the channels so:


You can see the puncture marks from the NPC connectors.  The aftermarket power cord (APC) did not have piercing connectors.  Instead the wires were soldered to the connectors.  When the cord was placed in the channels and the top of the NPC was screwed back on, the pressure pierced the cord, making the connection.  Elegant.

Note that there is a break in the top cord, skipping #2 entirely. 

I erroneously thought that the wire in the middle should cross over.  It rather looked like that was how the APC cord was wired.  I spent two hours yesterday trying to re-solder theses connections using 18 SPT1 wire.  I did it, but I did it wrong and ended up no closer to the solution.  I also learned that I do not want to try to solder wire to copper connectors, ever again. TYVM.  (Now that I examine this photo of the APC, I see that it appears as if there is a wire wrapped around the top cord at the left end, essentially connecting those two wires to each other and the terminal connection.)
Instead, the cord should have been wired like this:

See how the top cord, coming from the right, connects to 2 and 3, then has a break before it connects to 1?    The bottom cord connects to all three all the way through. 

Thanks to the folks at the Necchi Yahoo group for the photos of the correct wiring.  If I understood current, connections and wiring I probably would have figured it out just by looking.  Or, if I had remembered how I wired the power cord and foot controller on the FW, I might have figured it out.  But I didn't . 

Better yet, if I had just called my dear friend, Andrea, she would have set me straight right away over the phone.  But I didn't think of any of those things. 

Saturday, October 4, 2014

Random Decision

 After breakfast I pulled myself away from the computer and headed out to either the sewing loft or the shop. Admittedly I was reluctant to tackle the Necchi.  I had not checked in with the Yahoo Necchi Group (which turned out to be a poor decision).  I really wanted to sew but that dang Necchi was calling to me.   I went to the shop first, thinking that if the door is unlocked I will work on the Necchi, if not, I will sew. 

 It was unlocked.  My fate was sealed.

The electrical problems plaguing this machine have been haunting me.  I did solve one of the  problems.   I bought a new cord and the machine ran well, the light worked appropriately, but the motor smoked.  That was worry number one.  

I took a good look at the electrical on the underside of the machine.  It looked complicated and threatening.  I wondered how I would get at it.
 I took another look at the motor itself.  I decided that those bolts looked less threatening. 
So I loosened the ones attached to the motor and released the belt.

 Then I felt a presence behind me. It was almost as if he were saying "Do you really think you should do that?"  
I ignored him.  I think he was waiting for a treat.

I took another look under the machine.  This time I located the motor leads and where they connect to the electrical terminal.  I labeled the top one.  You can't see it but I wrote TOP on that yellow tape.  I need to be very explicit when I am venturing into new territory. 
I removed the plastic protection device.

I then loosened the screws holding the motor leads in place and released the motor leads.  
Then I removed the motor mount bolts and  VERY CAREFULLY removed the motor.
The rubber grommets in the motor housing and the machine bed were shot.  They were melted from over exposure to oil.
The brushes and commutator were easily accessible.
The brushes were saturated with oil.
I soaked them in denatured alcohol for a while and then burned the oil off using a lighter.  When there was no more flame, I declared them done.

All clean and shiny
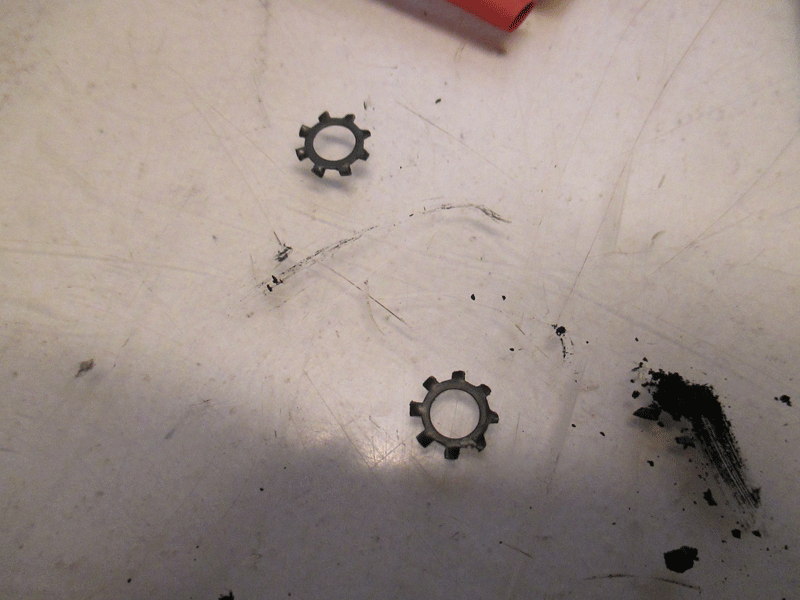
Just as carefully as I took the motor out, I placed the motor back inside the machine.  As I turned the machine over, a washer fell out.    I wondered where it belonged. Then I figured it out (see the photo above) .  I found the other inside the machine.  Lucky me.
It didn't take me long to figure out that I had to remove the mounting bracket from the machine bed in order to get the motor and these washers back together the right way.  That's because my brain was working.
The bolt into the machine was pretty oily

and there was a little puddle of oil between the machine and the mount.  I got a bit concerned that maybe the oil had filtered into the terminal.  So, I took another look at that and decided that I would see if I could get it off the machine.  

There were only three screws that held it in place .  I did have to remove the lamp connection, but that was easy peasy.  I don't have a photo for that .
I was pretty relieved to see that it wasn't oily or compromised at all.  I was able to slip it back together.

Problem number 2: the power cord that came with the machine is wired incorrectly.   When I use it   the light comes on but dims when I apply the foot controller and the motor doesn't run at all.  If I switch the cord around in the wall plug, the machine runs slowly and the light dims and the light doesn't turn off.   There is no change in power from min to max.  Something is wacko.   The machine runs fine with the after market replacement cord but the insulation on the wires prevents a good fit.  The cord will wear out in no time.

In fact, in an effort to figure out how the cord should be wired, I took apart the new cord and discovered that it was already wearing out.  In my effort to understand the wiring, it broke.
A and B are actually two different wires.  I point this out because they look like the same wire in this photo.

The next few hours were spent in a futile effort to get the power cord re-wired.   Oh how I wish I had checked the Necchi group first, as I had planned.   Finally, I did . There I found clear instructions with a photo and in less than thirty minutes I had the sucker re-wired.   The motor doesn't smoke, the machine runs in Min or Max and the light doesn't dim when I apply the foot controller.  In other words.  I FIXED IT!!

NECCHI SUPERNOVA

I am not so sure about this machine.
Mechanically it is well engineered and I would love to get it stitching.
The motor smokes.  I need to remove it and see why.  I can get the the belt easily enough by removing those two screws on the belt guard.
 
Uh Oh.  This is the housing for the electrical.  I will need to concentrate.  Or maybe read a murder mystery, instead. 
I may tackle it today.  Right after I check in with the Necchi Yahoo group.