This is a nice little 3/4 sized machine with zig zag, blind hem, stretch straight and stretch zig zag, not to mention the built in button hole and multi-stitch zig zag. I like this machine. Some of us call in a Keatherweight. Get it?
It isn't as diminutive as the Singer 221 but it has more functions. I can say the that FW has a much nicer straight stitch. But for travel and convenience I will sacrifice that for the other features of this machine.
I had NO TIME to get ready for my road trip to North Carolina last week. I grabbed this machine literally off the shelf in the shop. I bought it in March of 2011 when I was in Chicago. I am pretty sure that I serviced it when I brought it home. I hadn't used it since. Luckily I also grabbed my traveling work kit. I picked up some q tips and alcohol (isopropyl, well, ok some wine as well. I deserved a drink, too) at the Ingles around the corner from here. When I set it up yesterday to test it out I oiled it quickly and tried to wind the bobbin. The clutch wouldn't release.
So I set to work. I don't know if the other Keatherweights have a screw off (I did just write that) or a pop off top. This one pops off. I just grab it and pull.
Thus revealing the camstack and inner workings
I oiled everything and I pulled the balance wheel off too and cleaned it so that the clutch would release.
The feed dogs weren't working really well. The straight stretch stitch is short and the zz stretch stitch would not work at all. The feed dog didn't drop either. I wonder what it is about me, my North Carolina trip and Kenmores with feed dog issues? (http://mysewingmachineobsession.blogspot.com/2012/12/feed-dog-drop.html)
Since the feed was messed up I had to pull off the bottom. This machine has three screws holding the bottom on. One on the bottom itself and two on either end. You have to lift up the little extension table to find the one on the left end.
Be careful when you take this off. The little accessory tray has a flip top lid that is part of the bottom. Don't break it when you pull it off.
I got the whole thing lubed up. I even stuffed some grease into the shuttle gears. I was not in the mood to pull the gear cover off. I want to sew, for crying out loud ! And I found that the feed dogs were not high enough. By this time Mom had joined me in the "sewing room." I told her what the problem was.( I must correct the incorrect information here. The dime rule applies to diamond shaped teeth. DreinPA and I disagree about the correct height. She says the feeds should be half the height of the dime. I say the full height.)
With regard to these Kenmore feed dogs, they were too low because the underside of the dogs kept hitting the race. But I did have them too high. Drein PA states (also see her comment below):
I checked Ray's manual. The bottom of the v shaped portion of the teeth should be level with the plate when the dogs are TDC. I have no idea what TDC means. But I had to correct the dogs because I could tell they were too high. I did it by feel and now they are better.)
.
"I need a dime."
"There is one on the floor in the living room. I can't bend over to get it."
OK so now I know why the feed wasn't working so well. But how to fix it?
I studied the whole mechanism. Then I said "I wonder..." and violated the first tenet of sewing machine repair. Lubricate everything first, then get out the screw driver. Well I HAD lubricated everything. I just hadn't FREED everything up quite yet. Still, I couldn't resist. So I got the screw driver out and turned the screw; it was loose. In the photo below, you will see that the center is not in its housing. Before I turned that screw I positioned the feed dog drop lever in the UP position and turned the screw.
Well that explained that. I adjusted the height of the feed dogs and tightened that baby right down. Much better. (Not really see above and below.)
Below, note that the center is now in its housing.
Once I had properly adjusted the feed dog height, low and behold, the feed dog drop worked.
I was hopeful that the problem with the stretch stitches would be solved with that adjustment. Not so. I think that the problem there lies with the reverse function. Stretch stitches go forward and backward. I also think that the stitch length needs adjusting because the stitches are not gauged correctly; i.e. when set at 6 I get 8 stitches per inch.
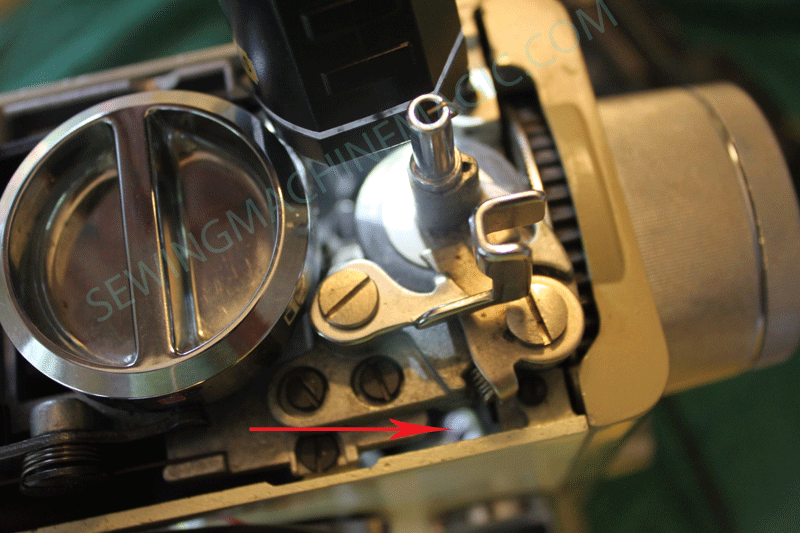
I believe this will require some more lubrication and perhaps an adjustment. I looked at the reverse lever and followed its mechanism. The bobbin winder is in the way but I could see a screw near the reverse lever that may require tightened or adjusting. I don't feel like pulling the bobbin winder to fiddle with it.
The arrow points to the screw. Yes, it is fuzzy in this photo. I brought along the Canon SLR to use and it just isn't as nifty for this work as the PowerShot. You can see that it will be easy peasy to remove the BW; two stupid screws. I should just do it. But I would rather sew.


