Monday, April 29, 2013

Cutie Patootie

This cabinet came with a Singer 401.  I love it.  It is a very well made cabinet.  The drawers are dovetailed and it looks like it is real plywood underneath the veneer.

It was the proverbial plant stand in its former life and subsequently the finish was peeling in the familiar round shape.  I think that likely a philodendron was sitting on this table. 

I sanded the top and was contemplating refinishing the whole thing when common sense took hold.  I have enough to do.  I was worried that the colors would be off.  When I sanded it, there was a light yellow stain underneath the finish. Some of it remains in the grain of the OAK veneer.  Time is of the essence, however.  We have company coming in a few weeks and I want this to go into the apartment.  Oh, I must also mention that Steven is tired of me taking over his shop.

The drawer pulls were stained and ugly.  I experimented with some black spray paint and liked the look so I painted the other two.  I am pleased with the outcome.  I hope to do the whole thing one day but for now it is good enough.  The colors match nicely.  Now to figure out which machine to put in it.  Oh, maybe the 306K.

Sunday, April 28, 2013

Drum Roll, Please

 Or, How Buddy Folly has changed.


I put this all back together.  I was pleased with how smooth the hook felt when I turned the handwheel.  With the feed dogs in place, though, it was binding up.  I figured out that somehow the feed dog height had been changed. I fixed that but discovered, in doing so, that the feed dog lifter roller does not roll. 

I think I may have to just keep Buddy.  I sure hope it stitches well. 

How to make a TRP(Tension Release Pin) continued

Peg wins the prize.  She advised that I smash the head of the nail.  I did.  I got out my hammer and I smashed it using Steven's sledge hammer as the anvil.  It worked.

 My only concern is that the smashed head, while the correct shape, is a bit big.


It could interfere with function.  I must experiment with trimming.  Good thing those nails are cheap.

Friday, April 26, 2013

Singer 201-2 Tension assembly

I have posted A LOT about the tension assembly.  In all of those posts, I have not shown how the check spring fits into the tension stud.  So here it is.   I have removed the tension assembly from the machine.  To do so, find the set screw just behind the thread guide and loosen it.  If you are lucky the tension assembly will pull out.  If it is stuck, loosen it with some tri flow or LW (liquid wrench) and wait.


The parts.
 Please note that the tension release pin must be placed into the stud as shown.  I recommend that you do so AFTER you have placed the check spring, tension discs and thread guard on the stud.  You will be less likely to lose it.

tail of the check spring
 Sandwich the tension discs (flats facing eachother) and the thread guard in between the coil of the check spring and the eyelet.
 Place this onto the stud so that the tail of the check spring nestles into one of the grooves on the tension stud.  If the check spring has too much bounce, you must move the tail to a different groove.  If it doesn't have enough, move it to a groove the opposite way.
(Don't forget the tension release pin.  It must go into the tension stud before you put the indicator on.)
Next comes the indicator.  Place it on the stud with the flat side next to the thread guard.
Now place the tension spring onto the stud so that the first half coil of the spring straddles the lower half of the stud.

Next comes the stop washer positioned on the stud so that the extension sits above the tension stud.
Now place the numbered dial on the stud positioned so that the Number 2 is oppositethe stop washer extension.
Compress the numbered dial against the spring  as you thread the thumb nut  onto the tension stud with the pin toward the numbered dial.  Guide the pin into one of the holes on the numbered dial.   Place the whole assembly on the machine, making sure that the extension on the thread guard fits into the hole on the machine. The presser foot must be DOWN when you out the tension assembly back on the machine.   Position the check spring so that it rests on the extension on the left side of the thread guide. 
Make sure that the  + and - are positioned on top and tighten the set screw.

Wednesday, April 24, 2013

How to make a TRP (Tension Release Pin)

A while back I was working on a machine that needed a tension release pin.  I can't remember what machine or why it needed a pin.  I think, actually, that the machine had a pin, but I wanted one a little bit longer.

I had some small nails that looked to be just about the right size.  So I got out the  nippers and cut one to size.  It worked quite well.

Recently, a reader emailed me about the tension release pin on a Singer 301.  I promised that I would cut  a TRP to the correct size and send it off in the USPS.  I finally got to it today.

I took the tension assembly out of the Singer 301A long bed that I bought last spring.  I had performed some aluminum rot surgery on it then and  never really finished that job.  I have yet to prime and paint it.  But the surgery was apparently a success.  No evidence of further corrosion.  At least on this spot.  Since the weather is going to be nice this weekend I think that I will finish this job and prime and paint the repairs.  Don't know why I didn't do it in the first place...

TRPs have a darling little nub on one end that prevents the pin from falling out of the tension assembly.  I cannot replicate that nub, so when using a custom made TRP, one must be careful not to let it fall out.

The TRP is 1 1/8 inches long.

The nail is 1 1/2 inches long
I cut off the sharp end and filed it down so that is was smooth.  Then I lined up the two pins next to each other in the  nippers

 And cut it to size.

I stuck the nippers and nail inside a large yogurt container when I cut the nail.  That prevented the nail and cut piece from ricocheting around the shop.  I did not do that when I cut off the sharp point.  Luckily the nail didn't fly far.  Who knows where that little pointed sharp piece is.

I did have to cut the nail again because the first time I didn't get it short enough.  Better that than the other way, eh?  


This pin will fall out of the tension assembly, unfortunately.  I guess one could put a tiny little dollop of JB Weld on one end to prevent that.  Hmmm may have to try that.  

Wednesday, April 17, 2013

Chemical reaction

I am forever mixing various solvents and cleaners when I am working on a machine.  I never know what was in that little cup previously, nor does it matter to me.  I just add whatever solution  I need, degreaser, denatured alcohol,  TR-3. 

Some mixture created this when it dried out. 

Monday, April 15, 2013

26.2

 I am sorry.  I cannot ignore what happened in Boston.  It breaks my heart and I just had to say so. 

Sunday, April 14, 2013

THE STUDIO

I am a member of the Facebook Group Vintage Sewing Machines.  Another member had posted a photo of his workspace which included an area set up for taking photos, complete with fancy lights.  That picture inspired me.

The table next to the work bench was covered with machines.  When Steven set up the shelves for me, I moved those machines and thus, freed up the table.  I set it up as THE STUDIO.

I don't have room for the tall  photography lights  with the reflective umbrellas so I bought some smaller ones.  I do need to figure out how to diffuse the light to avoid shadows.  I have not given up the idea of creating smaller umbrellas.  Thirty three inch umbrellas just seem so BIG to me.

Nor did I have the floor space for that huge stand.

I covered the table with an vinyl(?) table cloth.  I cut it down to size and  mitered corners on two ends. It tucks easily over the back of the table and drapes in front.  With the left over fabric I made an elastic cover for the round and round (isn't that so much nicer than LAZY SUSAN ?)


Test shots follow:
Singer 99K  1923

Singer 99K  1923
 I like it.  I can collapse the lights, fold up the table cloth, remove the cover from the round and round, fold up the back drop  and tuck all of those items away until I need them for "PHOTO SHOOTS" 

Of course you all know that the challenge will be for me to keep that table clear.   I think I am up for it.  I really like how this space works.

Friday, April 12, 2013

Buddy Folly

I took Steven along in hopes he would prevent it.  He didn't.  I truly felt a strong resolve that I could resist.  I would only buy it if it was in really pristine shape.  Truly I believed that.

But I caved.  I bought it.  It is far from prisitne.  I am weak.  That is all there is to it.

The decals are lovely from the front and the paint is good.  The machine is only 55 years old.  I don't think it was used much.
There is a bit of a flaw on the back.  The face plate is a bit rough.  The hook is icky icky icky.  Rusty Rusty Rusty. The wiring is good, though.  The motor likely is fine. I think I can save him,  I really do.
I took the hook out.  I removed the bobbin case first and almost had a heart attack.  When I released the retaining clip on the ring I thought I had broken the clip..  Nope, the ring just jumped right out of the clip.  Next the feed dogs came off and then the position plate. (I still don't know if  it is supposed to be bent like that or not.  Drives me crazy)


 Then I was able to remove the hook, in all its glory.
A picture is worth a thousand words.  
 I started to clean away the rust with the honing stick.  I have more work to do. 
Perhaps it is easier to note the before and after comparison on the retaining ring.  I haven't finished it yet, either.  You can see how much cleaner it is, halfway down.


I think it will be ok. Just more work.  I will, no doubt, take the clips off of the hook and really scrub it and hone it.  I just hope I can get into all of the little crevices. 

And I hope it wasn't folly to buy this machine.  I guess, though, that will be a good name for this machine.  Buddy Folly.   Boy.  It has been a long time since I named a machine.  Wonder if this means its a keeper?
Or Peggy Sue?  NAH.


Wednesday, April 10, 2013

Singer 115

Usually when I start on a machine, I finish it.  For some reason, I put this 115 away before I had it all together.  Today I decided it was time to finish it up.

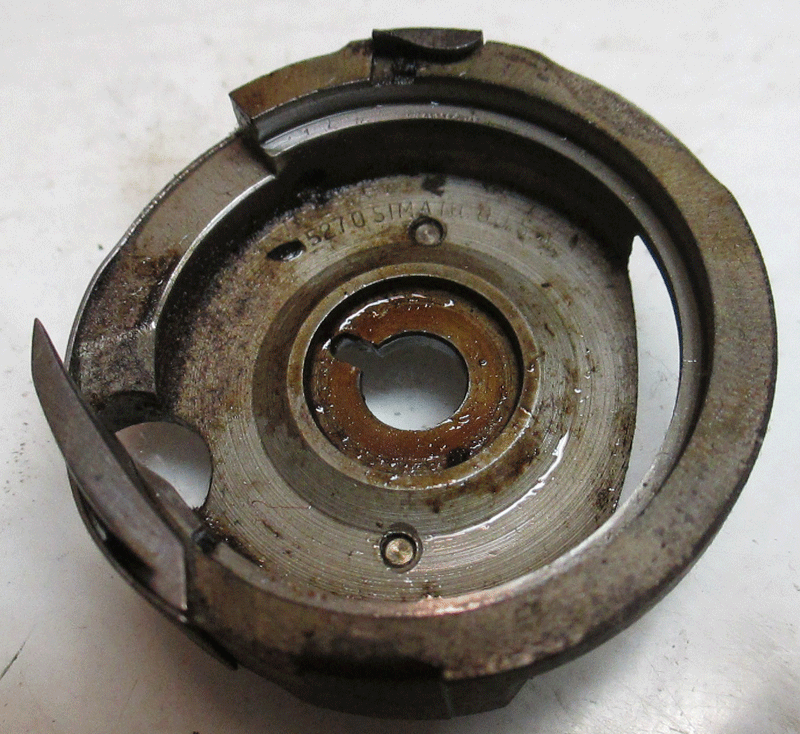
I tried cleaning the hook in place as you can see.  I was not terribly successful.  So I took it off. 

Having recently worked on a 319 with a similar configuration (rotary hook with a stationary finger) I was able to re-assemble this.  But not until I had cleaned the hook.

I took that apart.  It was easy.  The two little screws came right out.
And the bobbin case base lifted out.

I scrubbed the hook with a honing stick, some sand paper and denatured alcohol.  I did the same for the bobbin case base.  I put it all back together.  It wasn't right. The bobbin case base was too loose.    I took it apart and fiddled with it and got it right.  I bet I spent more than an hour on this part alone.  But this is the crucial part.  No point in skimping here.

This was where I panicked a little.  I took the hook off of this machine eight months ago.  I was sure that I took photos but was too lazy to  fetch the computer and look at them.  So I figured it out.   The shaft had a flat.  There was one set screw missing from the hook.  I usually remove the set screw that houses the flat when I take off a hook that sits on a flat (e.g. FW) I replaced the hook positioning the vacant screw hole over the flat and tightened both set screws (I was clever enough to keep all of the screws).  It seemed to work.

Pretty nifty, eh? The bobbin case is brand new.   I don't have any idea what that cute little curly cue wire is for on the bobbin case.  The bobbin case photos in the manual doesn't seem to have that.  It works.  That's all I care about.

I also had to reassemble the presser foot bar, spring and presser bar lifter.  I set the presser bar height at exactly one EPIF (Elizabeth Perry Index Finger) height above the feed dogs.
The feed dogs were filthy.  I had to soak them in degreaser, scrub with a wire brush, pick out the lint with a dental picke and rinse in denatured alcohol.  They are stained, but clean.

 I put the repro hand crank on so that I could test the stitches.  I like it.  I think I will have to get another so that I can just keep this as a hand crank. ( I like to have a hand crank on the work bench for these Singers so that I can test stitch them without having to put the motor on)

I threaded the machine, guessing for the most part.  I have a manual for it; downloaded from ISMACS, but I did not have it in the shop.  Since it worked, I must have threaded it correctly.  Threading is the same principle from machine to machine.  Once you have an idea, you can pretty much figure out any machine.

It is about as clean as I can get it.  The machine was commissioned in 1916.  It has had a hard life.  But it stitches.  That, there, is a miracle.