Showing posts with label Singer 201-2 light. Show all posts

Sunday, January 13, 2013

They All Look Alike

I had been having a love affair with the 201-2.  I love its sleek body, the quiet motor, the perfect stitch.  I have serviced seven as of today and, honestly, that is enough.

It is reportedly the best sewing machine that Singer ever made.  I believe it.  Every one of the machines that I serviced stitched beautifully as soon as I stitch tested it.  Now I did have an issue with "my" 201. The one that I decided was mine because it was the first motor I had ever re-wired.  It also is my logo.   It was sewing nicely then started to sew very poorly.  All of a sudden.  It was dirty.

That was the one with the stuck feed dog lifter roller.  Before I discovered the problem with the roller, I pulled the hook and found some dirty lint here:
Singer 201-2 hook
It is sewing much more nicely now and I hope that is what was wrong.  We shall see as soon as I try to use it and really test it. (This photo is of Lazarus's hook.  It had a burr on it and I wanted to see if I could depict it photographically.  I can see that the hook looks rough,

here is a better photo...


 I sanded it down can you see the difference?

This final 201-2 to be serviced has been sitting around since summer of 2011.   It came with a #42 cabinet. I was still pretty naive then.  I was also pretty obsessed and reading Craigs List like it was Fifty Shades of Gray.    I was so thrilled to have found this one, in a #42 cabinet no less.  The asking price was 100 bucks.  I pointed out the need for a complete re-wire and offered much less.  He accepted.  Lucky me.

 That same day I bought another, in a Queen Anne cabinet.  It wasn't that much further to drive, maybe only another hour.   I spent the whole day on the road chasing 201s.  I did some self-flagellating on the way to pick up the second machine.  I was rewarded, though, because this one looked pretty good.  The wires were intact and it ran nicely. Cosmetically it looked good.

I rationalized it on the 130 mile trip home from Granville, NY

"This one has good wires," I told myself.  "I can use it as a model so that I can re-wire the others and then I will have three really good machines.  I can keep one and sell the other two to pay for gas."

Turns out, the one I thought was a good one, the one I chased all the way to the Vermont border,  had a truly foul  re-wire job.
http://mysewingmachineobsession.blogspot.com/2011/12/another-201.html
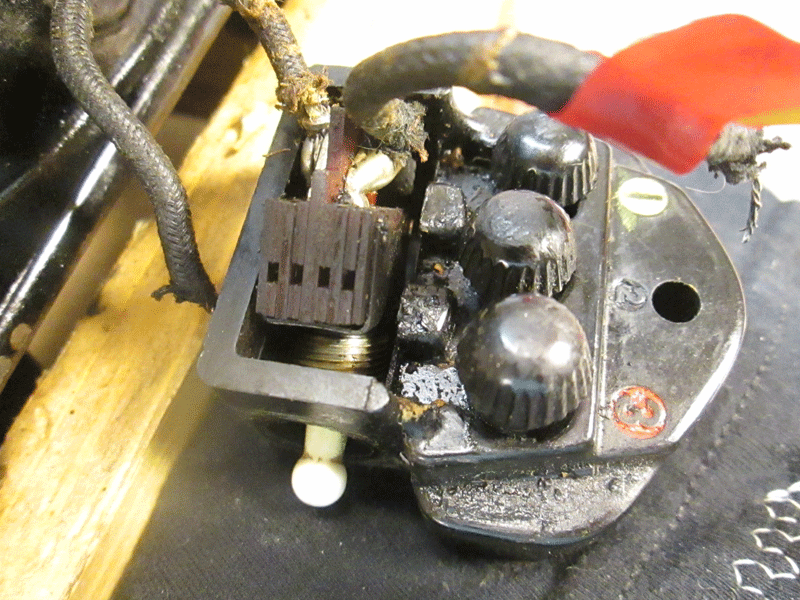
Today's had a very icky light switch and lamp connection.http://mysewingmachineobsession.blogspot.com/2012/07/theres-light.html

I had toyed with the idea of re-wiring the light.  I took another look today and decided that I could cheat and crimp on a new connector and add some shrink insulation and call it good.

What I did not understand was how to connect the switch to the light.  I knew I had taken photos. I had even written a very descriptive and detailed post about it.   I just was too lazy to leave the shop and look for the pictures on the computer.    I did figure it out.  The ring connector on one of the wires was too small for  Mr. Three Pin Terminal.  It would only fit on the light switch. Sort of a no brainer when you think about it.

  Nice and tidy, eh?
Now, that is not the original Mr. TPT.  I had bought some 201-2 parts I found on eBay.  I am so glad that I did.  It was worth the money not to have to clean out that mess today.  I will clean it all up eventually and keep the switch as well.  I might need it one day.  You never know.

And look, it works !
It didn't at first.......no bulb.  I am such a genius.

For a while I had a couple of 201s in process at the same time. For a long while from the looks of it.   I think the original motor for this machine went with the Granville, NY machine which I sold. It was cosmetically much prettier.   It doesn't really matter, I guess.  But it's just a sign that it is time to get rid of some machines. Or not to have more than one machine apart at a time.

I scammed a motor from a parts 15-91 and I contemplated re-wiring the motor leads.  I took another look and decided that the wires were intact and safe.  I did put new shrink insulation over them, soldered on new connectors and was good to go.
The brushes were adequate.  I like to put new brushes in when I service a motor but I am plumb out.  I did replace the grease wicks.  The motor sounds great.  BUT the clutch knob did not screw on all the way.  It was dirty, dirty,  dirty and would not tighten far enough.  Twenty minutes and three hungry dogs later, I had it all cleaned up and working beautifully.

I have yet to stitch test it. Perhaps on Wednesday.  I would like to set up all four of the 201-2s that I have for sale, each in a cabinet.  What a pretty site that would be.
Singer 201-2 1941
I doubt I would pick up another 201-2 on speculation.  I have four now that need to go.  If one landed in my lap I would take it but my days of driving 260 miles round trip (it was really only an extra one hundred miles that day) to fetch this model are over. 

Tuesday, July 10, 2012

Singer 201-2 light

The Singer Light sits on the front of the machine on a 201-2.  That is one way you can tell it is a 201-2 The round stitch length regulator is another.  Of course, the characteristic potted motor on the back is the tell tale give a way.

I have gotten myself into a project now.

The wiring on that other 201 (this is a photo of the Centennial.  Pretty, yes?)  is so bad.  I just have to pull the light.

So I dug in

The light comes off the front of the machine fairly readily.  One screw.
When the light is pulled away from the machine it looks like this back there.  ICK
That screw is a set screw that simply stabilizes the wires in the housing.  There is a little protector that sits between the wires and the screw.  You can see it in the next photo.

OK so now how do I get to the wires IN THE LIGHT FIXTURE?  Turn the lamp and look at the end and you will see the screw.


More fun.  I would rather......oh you know... anything...

Wilson had surgery today.  He had a big old fatty lump taken off of his chest wall.  Perfectly benign.  But it was big and as long as he was under for the dental cleaning, they lobbed it off.  He has a huge incision and I have to keep him quiet.  Not hard to do tonight.  He's pretty stoned on the anesthesia. Tomorrow might be another story.  So we have to go to Bainbridge to look at a Boye Needle Display.  Oh Darn.

There's a light

I used to live in Houston Texas in the late 70s.  That was where I first saw Rocky Horror Picture Show.     I still love the movie.  Now that we have a bigger TV and a flat screen it might be ok to watch at home.  But the theater is still the very best place to see it......I don't dress up....but I would take a lighter....

Anyway, this is the story of the light on this very icky Singer 201-2.  I have been scamming parts off of this machine for the 201 Centennial.  I have all the parts.  The tension spring (not check spring but the bee hive tension spring) the bobbin case position bracket.  The parts are probably fine but I wanted the best ones for the Centennial since it is going to market.

But I would like to get this one running.  Then all of the 201s that I have will be running.  If this one can't get up and stitching it will become a parts machine.

Since the 201 is Singer's best, supposedly, I think it is worth the effort to try.  And you all know how I love an icky challenge.  Just look at the melted latex on the pillar just above the light wire port.  YYYYEEWWW

I am sure that this is the worst of all four of the 201s.  I bought this one with a Singer 42 Deco cabinet.  I love the cabinet.  Its a mess too......

I took this all apart.
Once that 9/16 nut is off then the toggle will pass into the housing and it will come out.

I did remove the wires from the terminal before I did all that though.


Once the switch was released from the light wire, I could inspect it.

I found out that the  wire that goes to the three pin terminal is soldered on to the switch.  I thought that it would be best to try to buy a new switch.  I did .  It doesn't fit....  I don't know if there are others that might be narrower.  But I may practice de-soldering and see if I can't retrieve this one.


Another lesson.

The wires snake through the machine.  I already looked.  I can get them out.  But there is some sheathing around the wires that must be replaced.

But before I do any of that I have to be sure that I know how to de-solder.  At the other end of these wires is the light.  The connections to the light are also soldered.

And the motor that I thought (naively) that I could simply install, also, needs to be re-wired.  Or maybe I could just re-wire the end.....Nah.  gotta do it right.


More work.  For a machine that may not stitch.  Oh I think that is overly dramatic. This machine will stitch and I will learn how to re-wire a 201-2 light.  Yippee..  I  would rather go to the dentist.