The 221 and the 301 tension assemblies are very similar. I volunteered to do a post specifically for the 301 tension assembly. Here it is
A bit of anatomy first:
Open the face plate and look inside. Here you will find the tension release spring which is attached to the tension release lever (the lever that lifts the presser foot); the tension release pin and the set screw.
This is the same view with the presser foot up. If you play with your machine a bit, lifting the presser foot and then putting it down, you will see that the tension discs release with the foot up. That is because the pin is pushed in and the discs are loose.
Theoretically if you release the set screw you can remove the whole tension assembly intact. I couldn't seem to do that on my machine this morning so I didn't. Instead I started at the outside and worked in.
I have a plastic ice cube tray that I use to keep the individual pieces organized. I can put a little denatured alcohol in each little cube so that the parts can soak while I am dis-assembling.
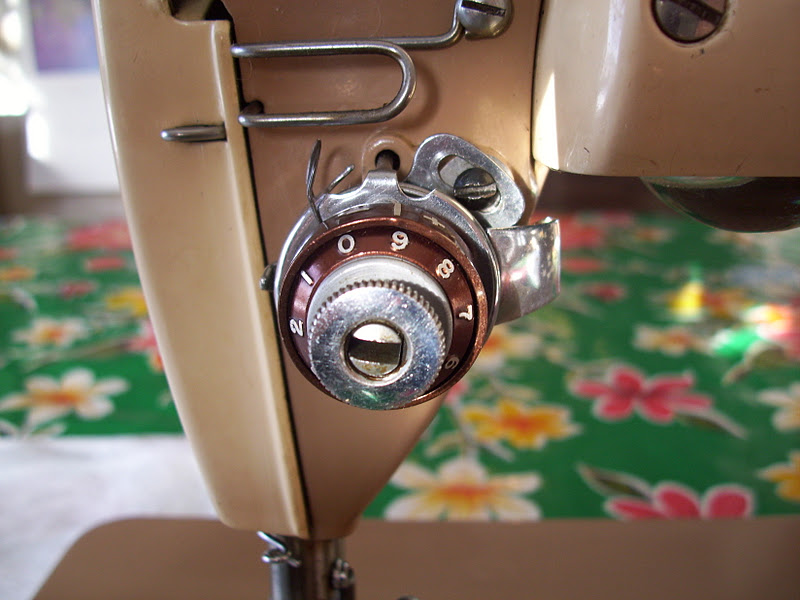
First I turned the chrome knob all the way, as loose as it would go. Then I pushed on the numbered dial to release the little stud in the chrome knob and removed the knob
Once the chrome knob is removed, you can see the numbered dial simply sits on the tension stud.
When you remove that, you see the stop washer. Take note of its position.
Once the stop washer is removed, the spring is revealed:
Then the spring housing:
The tension discs and check spring all come out together.
Finally the thread guide comes off. I put that little screw right back in its home, so I don't lose it.
Now I loosen the set screw and release the stud.
Within the stud is the tension release pin. It is best not to lose this. As you can see the pin can slip out of the stud only one way. Some folks are known to use a small finish nail to replace the tension release pin. You can see why it would work. That end of the pin looks just like the end of a finish nail.
Now that your tension assembly is apart, you can clean all the parts. I use denatured alcohol. I used to use isopropyl rubbing alcohol, but I like denatured better. I think it might have less water content.
Once your parts are clean, it is a matter of putting things back in the order they came out.
First the tension stud with the pin placed inside properly (head oriented in the stud as it is the photo above). If you, like me, prefer your -/+ spring housing to sit horizontally, you need to make sure that the tension stud is oriented as indicated in the photo.
Tighten the set screw. This picture shows off my Brownell Bits. I love them. This is a 150-3 sized bit. Fits perfectly. (I know that the bit is not in the screw properly. I only have two hands and I had to hold the camera too)
Next place the thread guide. I try to replace it as close to the original position as I can. I can fine tune this later if needed.
The tension discs go next. The only reason that I point out this next step is that I have replaced these discs incorrectly, even though I KNOW how they should go.
Sandwiched in between the other disc (the one with the stud) and the check spring.
The spring is positioned over the tension stud inside of the machine housing. Be sure to position the check spring accordingly above the "stop" on the thread guide. As you can see, the stud on the third disc fits back into that little hole just to the right of my red circle.
The spring housing goes next and then the spring
The stop washer fits in over the spring. I think it is important that the spring be positioned as it is in the above photo so that the stop washer can fit correctly.
The numbered dial goes next. Somewhere I read that the number 2 goes on top of the tail on the stop washer. I have no idea why, or if it makes a difference. I do try to do it, though.
Then, like before, you have to pinch the numbered dial in to replace the chrome knob.
Then the chrome knob goes on. Once your get it started on the threads, twist it on a bit before relaseing the numbered dial. The dial will catch on the little stud on the knob and voila, you are done, almost...
Test stitch and see how your tension looks.
A very wise Bill Holman of Vintagesingers (http://groups.yahoo.com/group/vintagesingers) suggested that I re-word my instructions. So I have cut and pasted his suggestion here. He is the smartest man on the planet when it comes to these machines. I am honored that he read my blog and took the time to make this suggestion.
I would suggest something more like: Once the tension is adjusted so that it is
correct on your test fabric, push in on the numbered dial while holding the knob
in position, rotate the dial to 3 or 4, and let it pop back out against the
knob.
.


I've had those apart many times, and they can be puzzing. I have never removed the post though. You do 'scarier' things than me! LOL! Thanks for showing us!
ReplyDeleteWOW,exelent :)
ReplyDeletemy blog for sewing machin
http://masinski-kutak.blogspot.com
welcome
If you could contact me via email (go to contact me at the top of the page) that would be best. Thanks
ReplyDeleteThank you, thank you, thank you!! Although I am working on the tension assembly of a white 221 I found these directions to be just what I needed to get my tensioner back ON. I just could not figure out how the spring was positioned. Your pictures are wonderful!
ReplyDeleteThank you, thank you, thank you!! Although I am working on the tension assembly of a white 221 I found these directions to be just what I needed to get my tensioner back ON. I just could not figure out how the spring was positioned. Your pictures are wonderful!
ReplyDeleteI just found a 301A at the thrift store on Monday. While cleaning it yesterday, I discovered that the tension area is really loose in comparison to all my other machines. Since I don't have a bobbin case (yet) for this machine, I figured I'd mess with the tension area later (yep, I'm a scaredy cat). Your instructions look great. Wonderful pictures (I need pictures, words just don't do it for me). I may have to pull this machine back out later and work on the tension. Thanks.
ReplyDeleteThank you so much for this step by step :-) I recently got this beautiful machine & trying to fine tune everything.
ReplyDeleteI am a fanatic quilter and piece my quilts on a 301A, love this machine. I decided to do some deep cleaning on my machine after I ran about 10 quilt tops through it. No problem, I have the manual. Well, there was a problem when I took the thread tension assembly apart to clean it! I couldn't get it back together with only the old manual instuctions. Thank goodness for your perfect directions and pictures on how to do it. It's back together and sewing so much better than before. Just wanted to say thanks and your site is now in my favorites!.
ReplyDeleteHI there! I have been searching and searching the internet to find out how to assemble my tension knob. I have an old viking 564, I found this article to be extremely helpful. However, my only problem is that I have two stop washers in mine and I can't figure out where to place them. I do have the original manual for my machine but there is nothing about the tension assembly. I have looked everywhere and im completely at a loss :(
ReplyDeleteCould you please offer some help? Thanks so much!!
I dunno. I might be able to figure it out were I to have the assy in hand. I do have a Viking out in the shop, a 6030. I will take a look at it and see if I can figure it out.
Deletethis is awsome!
ReplyDeletealthough im trying to resurrect a domestic 153 tension assembly this might help.If not i ll just hurl it out the window lol
Thank you, Elizabeth. I am working on a 301A. I started with the lock washer at 3 and by the time I got to your reassembly, I decided to move the post out and put it back so the lock washer would be at 12, the way you show it. Hope that didn't screw anything up to much...it will be a while before I can test as I'm stripping this baby ( my first slant needle ) down. I agree, Bill Holman rules, though I seem to get in trouble whenever I say anything on the touchy sewing machine groups, Singer, vintage japanese, etc!
ReplyDeleteWilliam
I haven't checked in on the Yahoo Groups in a while. The new Neo format makes me grumpy. Guess I will check in and see....
DeleteHave a 301A My mom Purchased New to mae me baby cloths 1954. The other day the whole tensjon assembly popped off. sure hope thjs helps. Love thjs Machjne best of all
ReplyDeleteHi Do you happen to know what size the tension release pin is suppose to be Thanks Susan
ReplyDelete1 inch and one quarter
Deletehttp://mysewingmachineobsession.blogspot.com/2013/04/how-to-make-trp-tension-release-pin.html
Thank you so much for this tutorial. Your photo of the tension discs helped me figure out what I did wrong when putting together the tension assembly on my 401a. I had placed the outer curved discs facing each other rather than curving outward as they should. The YouTube tutorial that I watched when I put together the tension assembly showed a machine with three flat discs so I foolishly guessed that the curved discs should curve inward toward each other, not stopping to consider that this would prevent the discs from applying tension on the thread. Thank you again for posting this and for including such clear photos.
ReplyDelete