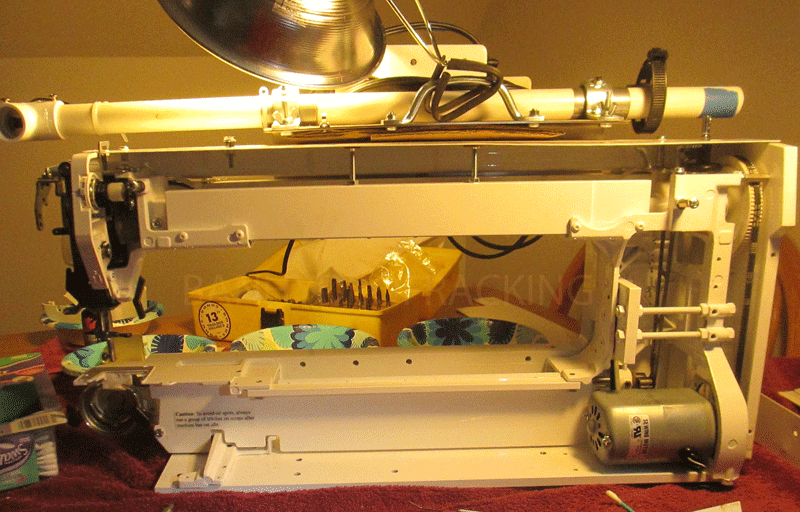
Four years is a long time in a sewing machine's world. All sorts of things can happen during that time: congealing oil, condensation, temperature change, rust. Even brand new machines can get gunked up and can need servicing.
I was concerned about the Bailey since I had not used it in that long. True one winter I kept a little heated hut over it (http://mysewingmachineobsession.blogspot.com/2012/01/room-of-its-own.html). But this past winter I moved it from the sewing loft to the apartment. I don't think the temperature swings were as extreme in the apartment as they were in the loft. I probably should have put the little igloo back over it. I didn't
Given what I know about machines, I truly wanted to check out the Bailey before I started sewing with it again. Yesterday, Betsy and I tore into it.
I don't have a photo of the shuttle gears. I wish I did. Next time I clean them and oil them I will snap one. They aren't that big. Singer 201 gears are bigger. Singer 201 gears are all metal. The Bailey has one either nylon or plastic gear articulating with a metal gear. Go figure. The motor is a universal sewing machine motor and looks easy to replace, should the need arise. The belt meets a plastic handwheel. There are some plastic bushings and that piece from the upper shaft to the lower one could be beefier, IMHO.
I wish it were easier to access the tension. To do so you have to remove the whole front panel; ok it's only two screws. I will quit complaining.
I prefer face on tension assemblies. I don't like the "lie in" ones. We found a piece of thread stuck in there.
It was not hard to remove. Had it been a face on tension assembly, one would have seen it straight away when it became lodged. I have used face on tension assembly machines in this application before and they worked just fine. But this is what it is.
I sure would like to know what he used as the starting point for this "bastardization."
The hand wheel and belt look adequate. I think that the hand wheel is plastic. In 25 years likely it will need replacing.
By 3:30 we had it all back together and set up on the frame.
Admittedly, the first row of stitches SUCKED POND WATER. I had forgotten to tighten the tension. We managed to complete one row of stitches, break a needle and give up for the day. But the goal was accomplished. The Bailey was serviced.


Well, Chuck has new lights on the machines which I think will help, two LED clamp ons. If I had to buy any other machine to be this size, I would not be able to afford it and I am trusting that it will do what I want to do, quilt lots of quilts with FMQ. Congratulations on servicing and ready to roll!!
ReplyDeleteThe GMQ is outfitted with a pretty nice light. It wasn't on in the photo.
DeleteYay! You serviced it!!
ReplyDeleteOMG - I've missed reading your blog SO much (library hours are limited lately, public holidays, closed downs...)
Elizabeth,
ReplyDeleteThis is off topic, buuuuuuuuuuuuuuuuut - I owe you BIG TIME!!!!
Yesterday I was sewing away (understand that I am a complete idiot when it comes to sewing.) Anyhoo, somehow I managed to sew my finger, Yeppers - bleeding like a stuck pig. In the process I broke the needle. Only one needle in my case and it was the wrong size. I bandaged up and headed for Wally World to get some needles.
This morning I put the new needle in and thought, "Hmmmmm, I better make sure the tip is not lurking in the machine somewhere so I took out the bobbin, unhinged the little round thing, took a look around, and didn't find any pieces. When I went to put the ring back on, the inside bobbin holder thingy fell out.
DO YOU THINK I COULD GET IT BACK IN??? Nope, nada, no way.
I decided to take a gander online. Surely someone would have some advice or I could find a picture. I looked at about 10 different places before straying unto your post of Aug. 27, 2012, "Complete the Circle."
BINGO!!! Those three words solved my problem. What a perfect way to explain which way it goes in. Inside thingy in, outside ring thingy back on, and machine working super nicely with it's new needle.
Oh, I did find the needle tip on the floor so at least I know it's not lurking in my finger or my machine.
THANK YOU!!!!!
I've bookmarked your site as I'm sure I'll need you again.
Adrienne
I am glad that I could help. Actually it was Mr. Bailey (of Bailey quilt machine fame) who taught me "complete the circle."
DeleteIn the interest in helping you expand your vocabulary: The inside thingy is called the shuttle hook. The outside ring thingy is called the race cover. The hook shuttle sits in the race. The other piece is called the shuttle driver. Your lesson for the day is finished.
Got it! Shuttle hook, race cover, shuttle driver.
ReplyDeleteTo add insult to my weak little mind, the whole stupid thing was in the back of my manual. Duh! But, your pictures were waaay better. Thank Mr. Bailey for me.
Such a meaningful quilt in so many ways. No wonder he loves it!
ReplyDeleteCongratulations on scoring the leftovers!
Which machines did you use? (Just curious.)
HMMM wondering if this comment should match a different post?
Delete