Saturday, April 19, 2025

Singer 20U Professional

 It's a story. M. loves to make art quilts. She finds pictures of human body organs (think heart, kidney, lungs, cancer cells) and uses applique and thread painting to create wall hangings. She does flowers too.  She started out with a Singer 237. Then something went apeshit with the motor on that machine. I switched it out for a Vintage White 1099 Jeans Machine. She did really well with that. One day she declared that she was done with the White. "It's messing up the thread, I can't get it to stitch right, I just don't like it."

Of course everyone who does what she does (art quilts) has a Bernina 800 series. Yeah, no. 

She wants: needle positioner, needle up and down, zig zag, straight stitch, and feed dogs that drop to allow for free motion quilting. This is not an impossible list. Such a machine is available with additional stuff that she doesn't need; i.e. 300 decorative stitches and an automatic butttonholer. She also has an aversion to plastic computerized machines. I taught her well.

Ultimately we came to the conclusion that a Singer 20U with a servo motor and needle up/down positioner would work. We found a Singer 20 (a blue one, it's reportedly the best) on Craigslist. True, it had the clutch motor. I was sure changing that out would not be a problem.

I know some things about machines. I was thoughtless when it came to testing this 20U. Oh, it stitched. It stitched well, until it didn't. It jammed and would not budge. It wasn't the motor. That was fine. Nope. This thing felt like it had a thread nest. We did spend some time spraying Tri-flow on all the gears. They looked dirty, but fine. I took off the top, I looked at the bottom. Squirt, spray, nothing. I did not look at the hook. 

I brought it home. The seller was stuck. No way could they sell that machine in this condition and I really wanted it. Don't judge. We agreed that if it magically started working when I got it home, I would send him a reduced price. If it didn't and I couldn't get it working, he wanted the machine back. 

Right. 

You know that as soon as we got home,  I took off the needle plate, tipped it back on it's side and removed the bobbin case. I doused that hook with oil and slowly got it to turn, just a bit. Holy moly, no wonder it jammed. That hook and race was a fucking mess. 


I had estimated that it would take me ten hours to get this machine stitching again. The seller balked at that estimate. It took longer. Maybe if I had been more methodical, or if I took the hook off the shaft (I tried) it wouldn't have take as long. 

Even this is not as clean as it ended up. 

Did I learn anything from this escapade? Not yet. I'm still rescuing machines. I saw   a 1960s Bernina Industrie listed in New Jersey. Not gonna happen. This 20U is stitching. I'm gonna tinker with it some more. I have needles coming soon. I have a new bobbin case on hand. My dream is to get it set up so M. can continue her journey in art quilts. 


Monday, March 25, 2024

Thursday, March 21, 2024

Off the Frame


I had just starting FMQ around the flowers when the tension went WACKO. Yep, I had run out of bobbin thread. My Nolting CLX doesn't have a warning for a low bobbin or empty bobbin. Despite my chronic tinnitus, I can hear the difference in the machine when the bobbin runs out. I don't sew for very long without bobbin thread. I do, however, sew a long time when I run out of bobbin thread on the 201 or the 301. That's maddening. Some folks wind two bobbins and use one on top of these vintage machines so that when the top runs low, that means the bobbin is running low, too. Not me. 

I finished quilting EW today. Oh dear, those are unfortunate initials. They do, however, appropriately describe my feelings toward this particular project. I have been unhappy almost from the start. I am a finisher and I persisted. I practiced ruler work with a circle ruler from Quilter's Apothecary  My initial stitches were pretty bad, just too messy and I did not like the design. I unzipped the quilt from the frame so that I was able to sit on the couch to rip much of it out. Surprisingly the quilt zipped back on to the frame easily. Probably because it was a small quilt. I had never done that before. Kinda chuffed (they say that in the UK) that they worked so well. I finished all of the hexagons first and then went back to do the FMQ on the panel. 


The dense quilting on the panel will hold the added batting in place in the center. I wonder if it will bunch up under the hexagons after washing. Since it is a wall hanging, I imagine I can press it out if so.  


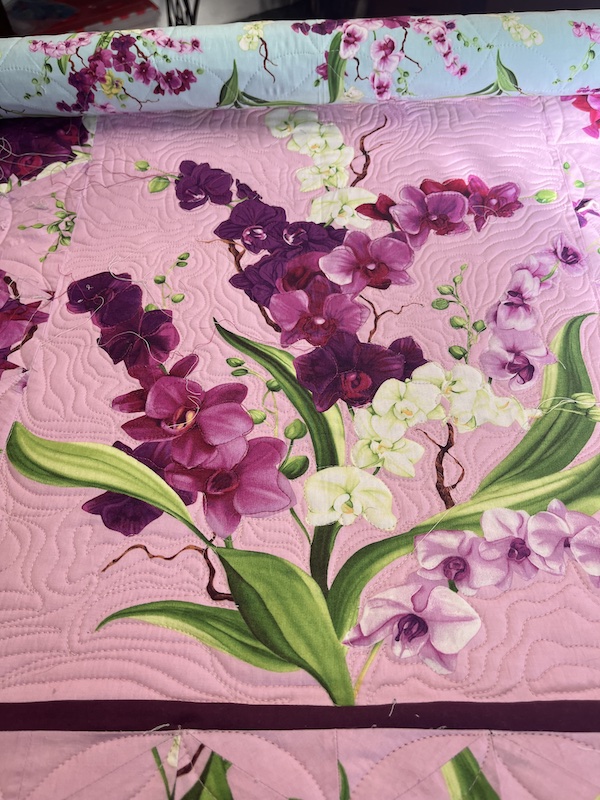
I took this photo in the ambient light from the small basement window.  I like it now that it is quilted. The echo quilting inside the panel was relaxing. I did use stitch regulation for the whole quilt. I have to for ruler work. My machine does not have an automatic needle down which would be a VNF(very nice feature). I am learning how to keep from stitching inadvertently when I shift the ruler. Every quilt is a lesson. 
I will bind it with some Moda Green Grunge I bought today. It's pretty much a perfect match to the leaves. I dunno, this panel did end up pretty much how I imagined it might look after all. Close enough.


I did it again


I am not fond of this flimsy. I bought it when visiting Asheville, NC at Asheville Cotton Company. The panel caught my eye and it was on sale. So I bought eight, because I couldn't buy seven. I should hae cut the strips smaller so that the hexagons would be smaller. I didn't. I struggled with the layout, I couldn't fit the panel in the center without adding back some of the border. I didn't give up. I persisted. I call this quilt my Elizabeth Warren quilt. 

The flimsy is 46 long by 48 wide. I had some leftover batting to use up. When I got far enough into the quilting, it was time to add the batting. Usually I like to sew batting together with a zig zag. My Kenmore 1158-1814 is not sewing well. It bunches the batting as I sew. 

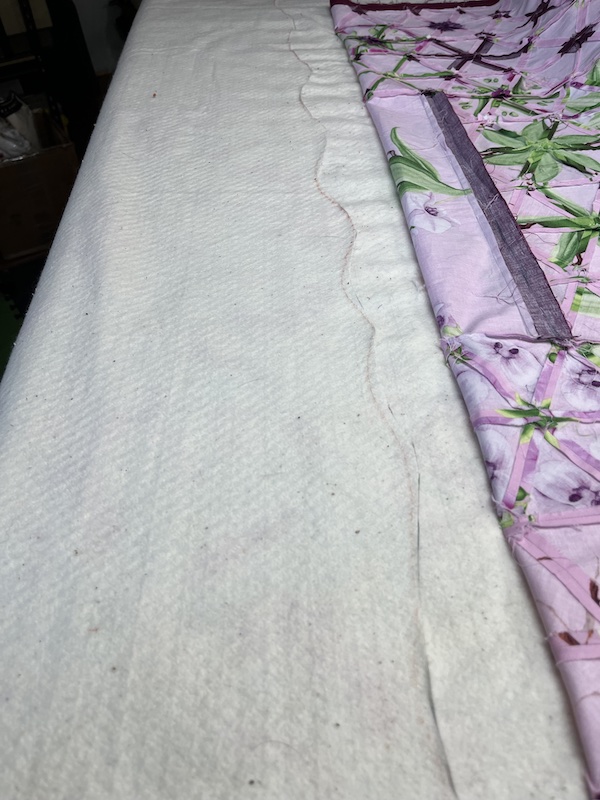
I lined up the batting pieces, overlapping the edges. I drew a cutting line and then cut the two pieces. 


Then I smoothed out the batting and went back to quilting. 
It will work. I think the bobbin tension is too tight in the 1814. I'll mess with that and update you all. 

I know that my previous post showed this same technique in an abbreviated form. Just thought some of you might appreciate the step by step. 

Saturday, November 25, 2023

Serpentine experiment


I pieced this batting on the Kenmore 158.1814. It looked great coming off the machine and when I placed it on the fleece backing on the frame. By the time I landed here in the quilting it was a wrinkled mess. Shit. I cut out the stitching and trimmed up both edges. Then I overlapped the edges and drew a serpentine line along the edge and cut it out. 


It's not the neatest cutout. I hope that the batting stays put. I quilted over it but my design is quite large, so...... 

I finished this baby quilt in just over an hour with just over one bobbin. Some of the flowers are wonky but, hey, I had fun doing it. As my son says, "Don't let perfect be the enemy of good." 


I chose a hot pink thread to stand out on the yellow. It blended well with the blocks and I had some trouble seeing as I worked. Had I turned off the lights and worked in the shadows, I think it would have been easier. We learn by doing. 

I enjoy working with fleece backing. This will be a cozy blanket for the baby when she is old enough for blankets. Right now she is still in utero, as they say in OB. 


Thursday, August 31, 2023

Foul Mouthed Quilter

 I now have a  dot com called FMQStudios.  M. named me that after she spent enough time in the studio on the longarm listening to me swear with increasing ferocity as I pieced a quilt. I don't even remember which one it was. Almost all my quilts start out as "the quilt." As I grow weary of the tedious piecing, "the quilt" becomes "the g__ Da__ quilt." Finally, as I stitch on the borders, it has morphed into "the g-- Da-- F------ quilt."  I created a FB page called FMQStudios for some odd reason. Did I think I wanted to create a business? Dunno. https://www.facebook.com/LizzyKateBetz

Today it was the perfect August day. Sunny, breezy, and agreeable temperatures. That meant that the She Shed was habitable.  I spent several hours up there stitching a practice french braid strip. I have so so so so so many scraps. I also managed to put together a 6 by 6 leaders and enders block. I wish I had the tidy gene.


Last week I cleared off the 31-15 so that I could use it to bind my most recent quilt, a Round About (pattern by Donna Jordan). I love this machine. It is almost 120 years old and is in it's original treadle stand with extension table. I managed to coordinate my feet and right knee so that the balance wheel stays put when I use the knee lift mechanism. There is no back tack. I start to stitch and then simply lift the presser foot with my knee and hitch it back a couple of stitches. Works like a charm. 


In this photo I am piecing some 3 1/2 inch vintage pre-cut squares. I found out that the 1/4 inch mark on the 31-15 is actually more like 3/16.  No problem unless you want a true 1/4 inch seam. Which I did when I sewed the binding on to the Round About quilt. Sigh. 


Monday, April 11, 2022

Squeaky Nolting

 I have a Nolting CLX 20 Long-arm. I keep a log to track hours since needle change and last oiling. It was time to oil today. I dutifully dropped one drop of oil onto each of the oil wick ports on the top of the machine head this afternoon. When I turned on the machine for warm-up I heard a distinct squeak. It drove me absolutely nuts. I waited a few minutes to see if oil would reach this squeak. Nope. 

This squeak was clearly a cry for lubrication. I cut the power to the machine, turned the hand-wheel and could hear a whisper of a squeak in two spots of the full turn of the wheel.  The wick ports were wet with oil. I decided that I had to get to the innards. 

Now, the front of the Nolting has 6 hex screws that holds the front plate and light bar in place. Two of them are located beneath the light bar, you can't see them in this photo.  The two on the left side of the photo below also hold in the back side plate.

Back Side plate. 

I have removed the front plate in the past. It requires disconnecting the electrical harness for the light and switches. It's a bit difficult to re-connect the harness so I would prefer not to disconnect that. I discovered that if I removed the two screws on the left side of the front, I could remove the back side plate. Easy. I was able to access the innards.
This makes me happy. I like to be able to see the working parts of a machine. PS,  I disconnected the power before I removed any screws. I also took out the needle. The wicks were wet and reaching their respective targets. The machine wasn't dusty with lint. As I turned the hand-wheel I oiled all the parts I could see. I don't have any idea where the squeak was but it went away. I buttoned everything back up and was back to quilting. 

That squeak might have gone away eventually but I like to dismantle sewing machines and I needed a distraction from quilt design. This scrappy quilt has been a challenge. At least today I accomplished something. 


Friday, February 4, 2022

Zippered Pouch

 I have an abundance of fabric scraps.  It seriously pains me to throw away fabric. I remember visiting a friend who did home decor and she threw away scraps that were huge! I mean three inches by thirty inches. WTAF?

Consequently I have bins of fabric scraps. Admittedly, I get anxious when I look at all these scraps. I am approaching my eighth decade (that means that I am almost 70) and I don't exercise daily. You figure it out.  I simply cannot bring myself to discard perfectly good fabric that I paid 7 dollars a yard for. Yes, my fabric scraps are that old. There are others that are much more pricey, so there is NFW they are going into the bin. 

Today I pressed and cut some 1 1/4 inch strips. Alternating dark and light appeals to me. I had an abundance of dark and not so much light. I dug out some lights, cut them into strips and proceeded to QAYG (Quilt AS You Go) a couple of zipper pouches.

I finished one. We got ten inches of snow last night and I had to clear the deck and the gate. Steven ran the snow blower and cleared the drive. I snowshoed (that is one weird looking word) a path around the yard so the dogs could pee and poop. 

At this rate, if all I did was make QAYG zipper pouches I could stay busy for the rest of my life. I have that much fabric. 

It might be time to destash. 


Thursday, February 3, 2022

Fixed it (DeLonghi steam iron)

Today the part arrived to fix the De Longhi Steam Ironing System. Shipping cost more than the part but the total layout was only fifteen bucks. The machine retails for close to 200 bucks so I thought it was worth it. 

It was a bit tricky putting the new tube/hose on. I don't even have a photo! It works. I am psyched. 

What looks like an overexposed photo is actually seam. The iron no longer leaks. If I get another year out of it, excellent. Even if I get a few months out of it, great. When it fails next time, I am gonna spring for a new iron. I'll probably get a Rowenta. 

When I called Ingrid (yes, she answered the phone) she asked what I was up to. I told her I fixed my iron. This time she congratulated me on my ingenuity.  

"Use it up, Make it do, Wear it out, do without," she said. 

"I think it's Use it up, Wear it out, Make it do, Do without, Mom." 

"No, you're wrong. "

OK. 

She's proud of me and that's good enough for me. 


Tuesday, February 1, 2022

Thwarted


I know that I was only supposed to buy one yard of fabric for the border for OBW 6. I found a suitable fabric within minutes of entering A Quilter's Garden.  I wandered around while Molly looked for her fabrics.  I wandered upstairs and found the sale items. I was doing very well until I saw this Philip Jacobs fabric. That was it. I bought all that was left on the bolt. Yes, almost 12 yards. Of course I will use it for another OBW.  I just won't be able to get to it right away. 
 

 I have a quilt ready to go and Molly will have one ready in less than a week.  Had I been able to start OBW 5 yesterday I might have been able to finish it by the time Molly is ready with hers. Alas, I could not. I ordered the perfect color thread from Linda's Electric Quilters, my go to for Signature Cotton Thread. The thread arrived last week but I had no occasion to use it until yesterday. When I removed the plastic sheathing from the cone (I did not use a sharp instrument to get that stuff off) I noticed that the perforations on the sheathing left residue on the thread and the thread was damaged. I tried to find some useable thread on that spool but the thread was deeply damaged. 

F#ck. I spent a few minutes looking for another source for the thread because I wanted it in a hurry. Once I calmed down and realized that no one could get me the thread quicker than LEQ could, I  emailed them and sent along this photo. Within an hour they had replied. "Dear Elizabeth, That is bad for sure."  I was offered credit or a replacement. The replacement is on its way.  10/10 I recommend them. 

I used zipper leaders on the Grace Frame I had eight years ago.  I decided it was time to install  zipper leaders on the Nolting. I have used Red Snappers and I have used pins to attach the backing to the frame. Red Snappers take up a bit of room in the throat, pinning takes up less.  Zippers will enable Molly and me (sounds wrong, doesn't it?) to switch out our quilts.  Brilliant (that's what the Brits say, innit? Oh I have been watching too much Graham Norton.)  

How does one attach the quilt back to the leaders? Yes, we could use pins. Why not use a chain stitch? It is no more cumbersome than pinning and certainly less dangerous. Simply stitch one side of the zipper to each end of the quilt back and Voila!

I did stitch a 6 inch wide leader to the zipper that attaches to the take up bar.  I suppose I could have stitched the zipper directly to the OEM canvas leader but I think that would have been tricky. I stitched a 6 inch wide leader to the zipper that attaches to the backing bar as well. That one is held to the OEM canvas leader with Red Snappers. I likely will stitch it in place eventually. 

 I don't know if the newer machines have chain stitch capability. I think it is a useful tool.  True, the chain stitch uses a lot of thread, but it is a good way to use up old thread. Maybe you don't have a lot of old spools lying around. I do. They came with all those machines I "rescued" during my SMAD phase. I haven't thrown out that old thread. Now I have a perfectly respectful use for it. 


For more about chain stitch adaptor for this machine check this out: http://mysewingmachineobsession.blogspot.com/search?q=chain+stitch. I had pilfered a Youtube of Aretha Franklin Singing Chain of Fools for the aforementioned post. That was not allowed and it has been removed by the authorities. I am sorry.

Monday, January 31, 2022

It's Cold.

The furnace didn't work last Thusday morning. Steven lit a fire early, before his dentist appointment, and he turned up the heat in the bedrooms. The furnace didn't kick in.  It was 27 below zero. The furnace tech came within hours of our call, despite our insisting that this was not an emergency and others might need them more urgently. 

He couldn't figure out what was wrong. He thought it was the circulating pump but replacing that didn't fix it.  He called a buddy, slightly more experienced. A pipe was partially frozen. It took all day to sort it out and so I couldn't get in my sewing space. I was hot to work on OBW 6.


I had all the hexagons sewn into strips. I had sewn some strips together. I lost a day Wednesday because Theo had a spell during the night and I was sure it was his time. He rallied after a double dose of prednisone, some gabapentin, and some cooked ground turkey. I cried a lot, lost sleep, and overall decided that I couldn't deal with it if he died. He didn't.

I had been using the 31-15 for sewing the strips together. It is quite a lovely machine. I love it for the knee controller that lifts the presser foot. The machine is so old that it doesn't have reverse. Something is wrong with the needle bar, though. The clearance between the hook and the needle is very close. I know that it is the needle bar because the needle sits way right in the hole in the needle plate. 


Interestingly, if I use a #90/14 needle it will stitch but it hits the hook. I am using an 80/12 and it works just fine. 

I took the needle holder and thread guide off and cleaned it all up but found no difference. I guess I will fiddle with it some more before I tear into the needle bar. As I think about it, though, if the needle position shifts more to the left, the needle will hit the hook. I'm thinking maybe this machine has been re-timed to account for the wacky needle bar. Sigh. 

OBW 6 is all stitched together. I need to find some yellow fabric for the narrow border. That means a road trip to  A Quilter's Garden in Montpelier.  I guess road trip isn't exactly the right descriptor. Montpelier is 34 miles away. I have been cooped up for days, though, so it will feel good to get out of town. (Did you notice, I flipped the quilt?)


Theo isn't really that much bigger than Kota. Apple iphone camera distorts things. 

Fortunately the bitter cold may be finished. Wednesday's forecast is for 38. Today hit 21 and it was sunny for much of the day. After weeks of sub-zero temperatures, today was a gift. 


Saturday, January 22, 2022

Leaking Iron

My Delonghi iron leaks. It's been leaking a while so I was using it dry. I now need steam. These OBW open seams require severe taming and steam is the way to go. I also bought a taylor's clapper to see if that will help.  I haven't tried it out yet. 

I got tired of sewing and decided to take a look at the iron.  I borrowed a Torx 15 from Steven and took off the back of the iron. 


No wonder it leaked. 


I think it broke when I took it apart. Clearly it was fractured before that. The inside wasn't all wet, so I can't imagine water had been spewing all over in there.

I don't know what this is made of but it stuck like glue to the male end in the iron. I scraped it off bit by bit. You can see the pieces in the background of the photo above. And yes, those are dental instruments you see. My hygienist gave those to me when she upgraded her set. Handy things to have around when fixing irons and sewing machines. 

It's all clean now. I looked online for the part. I found it for five bucks with 10 dollars shipping. So for fifteen bucks I can order the part. Or I can go to the local hardware store and see if they have something that will work. 

I love this iron for pressing long seams open. It has the perfectly pointed nose. 

I can glide that iron right down the long seam after I sew the strips together and just like the Red Sea, that fabric parts effortlessly. 

I'm pretty psyched. Tonight Mom actually answered the phone when I called. I told her that I was fixing my iron. 
"Why don't you buy a new one?"
Me: Because I want to fix this one. 
Mom: It would be easier to just buy a new one.
Me: Yes, but this one cost over 200 dollars. I thought you would be proud of how resourceful and clever I am!
Mom: Well, I did raise you to be independent and resourceful, so , suit yourself. But that's what money is for, after all. 

So, despite my aversion to spending more on shipping than for the actual part, I likely will order the tube on line and see if I can get another ten years out of this ironing system. 


Friday, January 21, 2022

Mending a Horse Blanket

Steven is a great father, grandfather and yes, great grandfather. He is such a good dad that he offered to mend Badger's blanket. Badger is a horse. The blanket is huge. The straps have been torn off in several places. He was going to sew it by hand. I scoffed. 

Me: Why not do it on the machine?

Him: The machine can't sew through all those layers of strap and the blanket too. I have mended many a tent by hand. I am sure I can do it. 

Me: Have you looked at it?

Him: No. 

Me: We should look at it. 

So Molly came by with the horse blanket today. Kota and Theo were thrilled. I checked out the job.

Two straps were double thickness polyester webbing. One was single thickness. I got the 15-90 off the shelf, switched it out with the 201-1 that was in the treadle stand. Put a 110 needle in and some 40 weight thread (I had nothing heavier, it will be fine) and in less than an hour fixed all three straps. One was totally missing so I found a ring I had in my purse hardware and constructed a replacement strap. Easy Peasy.

There is no way Steven would have been able to get a hand needle through all those layers. Shit, the man has a really bad Dupuytren's contracture on his right hand. Sure, he used to be able to sew tents, but tents don't have three layers of webbing and horse blanket. 

Anyway, I showed off. The 15-90 did the trick, no sweat. I'm not sure that the 15-91 would have done so well. That's why I love the treadle. I think you get better power with feet. I love the 201 but if I had to have only one machine, the 15-90 would be it. It's just so strong. 

 PS. The good news is I have a 15-88 that was born as a treadle. In the before times, I had occasion to go to Montpelier for a meeting. I just so happened to be trolling Craigs list a few days prior to the meeting and saw a 15-88 listed in Barre. I thought I'd take a look since I was going to be in the area. I told Steven that the meeting started an hour before it did so that I could have the time to check out the machine. Yes, I lied. The machine was in a storage shed among other belongings. It did not turn over and I had no tools to take it apart. I didn't even bring a screwdriver. I was pretty sure that I could get it going. I offered less money than they were asking and came home with the machine. 

Steven wasn't home when I got home. I unloaded the machine and took it into the basement. Then I drove as far as I could up to the She Shed and unloaded the stand. I wasn't really hiding anything, but did Steven really need to know I had brought in another machine?

So I got it running, hauled it up to the She Shed and told him all about it eventually.  When my neighbor came over to check out the She Shed she saw the machine. I told her the story.

Neighbor (who is married to a pastor): You lied to your husband ?
Me: Yes I did.
Neighbor: We'll pray for you. 


Thursday, January 20, 2022

It's usually the simple stuff.

I love my Singer 201-1. I love to treadle. Lately the treadle has been clanking. I think the original wooden pitman is failing.  At one point Steven had crafted a beautiful wooden pitman for another treadle stand I rescued. I'm hoping he can do the same again. The clanking is driving me nuts. (See here)

Me: Do you remember making that pitman rod for me years ago?

S: Yes, I do. What happened to it?
Me: It went with the treadle stand when I sold that machine. I think I need a new one for my stand in the studio

S: Well, let's take a look.

Which meant that we both went downstairs and I got on my belly behind the stand to look at the pitman rod. There isn't much room behind the treadle stand. I store stuff back there. Extension cord wires hang down. I'm old and stiff. But I managed.


Me: See? There's a small screw, maybe I can tighten it .
Steve: No, I can't see. 


It was awkward reaching the screw but I persisted (yes, my name is Elizabeth) and so did the clanking.

Steve: It looks like there is play side to side. Pop out that cotter pin and see if it will take another washer. 

I do so, it wouldn't. But now I see that the clanking is coming from the pedal itself. I see a screw holding the pedal to the irons. 
Nope that one is not loose. 


Yep. That one is. 


Problem solved. (Wow look at all that thread.)
 
And now I remember tightening that very same screw some years ago when we lived in New York. Sheesh.

Progress on OBW Six. I need more light and a better camera. 


And now I remember the time I had to tighten that very same screw about ten years ago when we were still living in NY. Who knows, maybe I even wrote a post about it. 

Look at all of that thread on that rug under that treadle.