Monday, January 30, 2012

Max on NPR

 http://www.kwmu.org/programs/slota/archivedetail.php?date=%272012-01-30%27


 Click on the link above if you would like to listen to my son participate in a panel discussion about Mormonism.  I am bragging because he is a  very articulate and  thoughtful scholar.   I never imagined this day when we had this photo of him taken.
I just loved his hearty laugh and twinkling eyes.    Do his ears look big to you?

Sunday, January 29, 2012

A room of its own

I have a mid arm quilting machine.  It is home grown with foreign parts, I believe.  I bought it  in 2010 with the intent of learning more about machine quilting.  I got a deal on the frame and I splurged on the machine.  What the heck, it was built near my home town and I am a sucker for nostalgia. 


My sewing loft is not heated and this machine lives there.  I could bring it in the house,  but I don't really have a place for it in here.  I thought that I would insultate the floor of the loft really really well and then have an electirc heater hardwired to the circut breaker and just keep the loft at 50.  Steven said the Barn is not built to code and it would be very inefficient to heat it with electricity because we could never get it insulated well enough.  I don't want to waste energy.  I can't keep a wood fire going all the time, either.  The little Jotul puts out a goodly amount of heat but it requires stoking every few hours.  Can't do that.  So, I thought, why not build a little box that sits over the Bailey, like a coffin top?  Then I could stick a light bulb in there and keep it warm that way.  We have used a light bulb under the floor boards in an old house to keep the pipes from freezing.  Heck we still stick a work light under the washer when it gets to sub zero.  Should work, right?

I had imagined a nice plywood box.  Steven suggested using rigid foam insulation and gorilla tape.  He even bought me the foam and showed me how to use his sheet rock square. Clearly the guy did not want to build me a plywood box.  I was willing to build it, but the table saw scares me and I would need to purchase the plywood, rip it down, brace the corners, screw it and glue it and mount the lamp socket.  So, while I initially resisted the idea of the rigid foam insulation, I set to work on this project today.
 
The idea is to score the cut with the utility knife and then go back, cut deeper and then cut the foil from the opposite side.  I wasn't so good at that.  Practice will improve my technique, I am sure.  
I cut three pieces 16 X 32.  (32 X 3 =96 which is aka 8 feet.)  I had no waste from that calculation.  The ends I cut 14 by 16 so that they could fit inside the sides and top.    I cut a 32 inch long piece  14 inches wide from the remaining 32 inch wide foam board. Then I cut that piece in half.  No waste there either.  I now have a a piece of rigid foam insulation that is 32 inches wide by 82 inches long left over for another project.   It appears that I know what I am doing wrt layout and piecing.  Not so.  Steven figured that whole thing out for me.

 Then I taped the whole thing together with gorilla tape and duct tape.


I wanted the light bulb mounted on the side of the box.  That way it would not touch any part of the machine.  I had bought a lamp socket at the hardware store and used it as the marker for the hole.

Then I used a very narrow knife to cut out the hole so that the lamp socket would fit.  I originally bought a nifty socket that would plug directly into an extension cord.   


But when I tried it out, the bulb was too close to the foil and it got too hot.  So I wired up the lamp socket and it works quite nicely..

These next photos I took with the camera on self timer from inside of the box.   The light bulb is no where near the machine.  


At first I used a 40 watt incandescent bulb.  
But it got way too hot.  So then I tried a 20 watt low energy bulb.  Still too warm.  The lowest wattage that I had was 13 watts.    I checked it after dinner and Steven approved.  Temperature inside the box 70 degrees.

I am a bit concerned that the mice might like it in there.  I did not do a great job cutting the end pieces and had to trim after the box was together.  I trimmed too much and there is room for the little vermin to crawl under there and warm up.  Fine, just don't shit on my machine.....  No building nests, no taking up residence.  Just get warmed up a bit.  Then leave...

I just checked it again.  68 degrees.  No mice...


Friday, January 27, 2012

olderisbetter65

Well I bought some sewing machine accessories and attachments on ebay and they arrived this week.  I am well aware of the concept Buyer Beware.  Still, I thought that purchasing accessoires might be a safe bet.  The lot included a light bulb.  In the photo on eBay it was in perfectly perfect shape.

When I opened the box yesterday, it wasn't in such perfect shape. Of course, packed with Styrofoam peanuts, there was no hope. 

 So I thought I would email the seller.
 Dear olderisbetter65,

Thank you for shipping so quickly. Because you packed the light bulb with the presser feet and did not wrap it at all, it broke. Please comment


 The reply:

im sorry about the light bulb, i just stuck everything back in there the way it came to me after taking them pics, then when i shipped it out it never crossed my mind, i am sorry


- olderisbetter65
 

I, in turn, responded:
Dear olderisbetter65,

As a business person, I believe that you are responsible for shipping your sold items safely so that they arrive intact.


The reply to this :


i agree, everything else was safe i hope, im thinking the bulb is worth about 25 cents , do you want me to send you a quarter?


- olderisbetter65
 
 I am pretty much done with this interaction.  And since I don't want to perpetuate negativity, I won't leave any feedback.  But this seller is in my never again list. 


Monday, January 23, 2012

Company


I spent Sunday and Monday on the couch.  Usually I work on Monday at my day job and Sunday I am in the shop with the machines.  Let's just say I was indisposed.  Both boys sleep next to me when I am sitting on the couch, but when I am napping, there is only room for one of them.  Good dogs, they took turns. 

SCORE!

Jonathan advised me that this was on eBay.  I was the only bidder.  I now have a manual for that black Japanese zig zag machine. 

Manuals, next to the needle, are the most important"accessory" of a sewing machine.  For those of us who know the basic operation, a manual can be verification of what we know.  But it is still important to complete the package, I think.  I am ever so grateful to Jonathan.  He did me a great favor.  I don't know how he found it, but I am so glad he did.  Bravo!!!!


Sunday, January 22, 2012

301 tension assembly

The 221 and the 301 tension assemblies are very similar.  I volunteered to do a post specifically for the 301 tension assembly.  Here it is
A bit of anatomy first:
Open the face plate and look inside.  Here you will find the tension release spring which is attached to the tension release lever (the lever that lifts the presser foot); the tension release pin and the set screw.
This is the same view with the presser foot up.  If you play with your machine a bit, lifting the presser foot and then putting it down, you will see that the tension discs release with the foot up.  That is because the pin is pushed in and the discs are loose.
Theoretically if you release the set screw you can remove the whole tension assembly intact.  I couldn't seem to do that on my machine this morning so I didn't.  Instead I started at the outside and worked in.
 I have a plastic ice cube tray that I use to keep the individual pieces organized.  I can put a little denatured alcohol in each little cube so that the parts can soak while I am dis-assembling.

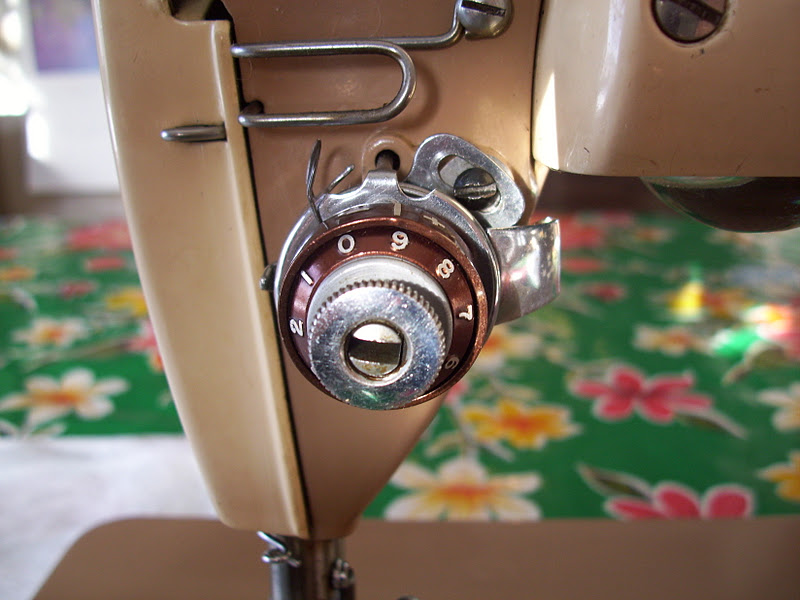
First I turned the chrome knob all the way, as loose as it would go.  Then I pushed on the numbered dial to release the little stud in the chrome knob and removed the knob

 Once the chrome knob is removed, you can see the numbered dial simply sits on the tension stud.
When you remove that, you see the stop washer.  Take note of its position. 
Once the stop washer is removed, the spring is revealed:
Then the spring housing:

The tension discs and check spring all come out together.
Finally the thread guide comes off.  I put that little screw right back in its home, so I don't lose it.
Now I loosen the set screw and release the stud.
Within the stud is the tension release pin.  It is best not to lose this.  As you can see the pin can slip out of the stud only one way.  Some folks are known to use a small finish nail to replace the tension release pin.  You can see why it would work.  That end of the pin looks just like the end of a finish nail.
Now that your tension assembly is apart, you can clean all the parts.  I use denatured alcohol.  I used to use isopropyl rubbing alcohol, but I like denatured better.  I think it might have less water content.

Once your parts are clean, it is a matter of putting things back in the order they came out.
First the tension stud with the pin placed inside properly  (head oriented in the stud as it is the photo above).  If you, like me, prefer your -/+ spring housing to sit horizontally, you need to make sure that the tension stud is oriented as indicated in the photo.
Tighten the set screw.  This picture shows off my Brownell Bits.  I love them.  This is a 150-3 sized bit.  Fits perfectly. (I know that the bit is not in the screw properly.  I only have two hands and I had to hold the camera too)
Next place the thread guide. I try to replace it as close to the original position as I can.  I can fine tune this later if needed.
The tension discs go next.  The only reason that I point out this next step is that I have replaced these discs incorrectly, even though I KNOW how they should go.

Sandwiched in between the other disc (the one with the stud) and the check spring.
The spring is positioned over the tension stud inside of the machine housing. Be sure to position the check spring accordingly above the "stop"  on the thread guide.  As you can see, the stud on the third disc  fits back into that little hole just to the right of my red circle.
The spring housing goes next and then the spring

The stop washer fits in over the spring.  I think it is important that the spring be positioned as it is in the above photo so that the stop washer can fit correctly.

The numbered dial goes next.  Somewhere I read that the number 2 goes on top of the tail on the stop washer.  I have no idea why, or if it makes a difference.  I do try to do it, though.
Then, like before, you have to pinch the numbered dial in to replace the chrome knob.
Then the chrome knob goes on.  Once your get it started on the threads, twist it on a bit before relaseing the numbered dial.  The dial will catch on the little stud on the knob and voila, you are done, almost...
 Test stitch and see how your tension looks.
A very wise Bill Holman of Vintagesingers  (http://groups.yahoo.com/group/vintagesingers) suggested that I re-word my instructions.  So I have cut and pasted his suggestion here.  He is the smartest man on the planet when it comes to these machines.  I am honored that he read my blog and took the time to make this suggestion.

I would suggest something more like: Once the tension is adjusted so that it is
correct on your test fabric, push in on the numbered dial while holding the knob
in position, rotate the dial to 3 or 4, and let it pop back out against the
knob.

 .

Wednesday, January 18, 2012

Singer 221 - tension assembly

Today my friend Paula came by.  Paula loves to sew, too.  She graciously took the tour of all of my machines.  She wanted to know how many I have, but lost count somewhere in the workshop.  Oh Well,  I know the feeling.  After she left I set to work on the Centennial FW motor and serviced it.  Then I looked through the blog and found some unpublished work.  This post is one of them.  I had forgotten to finish it.  So here it is.  All about the Centennial's tension assembly.  But first I started with cleaning the needle bar and presser foot lifter.

 Not terrible and a bit of denatured alcohol on a q tip made things shiny inside.
Then I took a look at the tension assembly.   Dirty. 
I thought that I would try to clean it in place, deferring to Dennis Steckley of We Fix It yahoo  group. (http://groups.yahoo.com/group).  I did not want to get alcohol on the black finish so I took it apart.
Thumb nut and numbered dial removed revealing stop washer
Spring which looks upside down to me.
Spring housing

check spring and discs

Thread guide
I cleaned all of the parts with denatured alcohol.  I did take the stud out and clean it , as well.  I like clean and shiny metal parts. I ask you, which one would you rather sew on?
I also serviced the motor for this machine today.   The terminal end of the number 2 wire had fragmented from its connector.  I tried to "mend" it with solder.  That did not work.  So I put a new terminal ring on it.

That worked very well.

The motor runs nicely and the machine makes a very nice stitch.  Cosmetically it is rough.  The clear coat is coming off and it looked dirty after I cleaned the machine and put some Carnuba Wax on it.  I guess I have some cleaning to do.  This machine smells like my Grandmother's 221.  I love that smell.  I doubt I will be able to part with this machine just because of that smell.  Sentimental doesn't pay the rent, though.  But then again neither does sewing machine repair.

Last week I had a call from someone who got my name from someone.  She inquired about my fee to service her Featherweight.  I explained that I would clean, oil and adjust the machine; check the brushes, but not service the motor, grease the gears and clean and polish the machine.  When I told her the fee, she said she would get back to me.  So I guess she thought my fee was too high.  It is about half the standard bench fee at the closest sewing machine service shop, forty miles from her.  Perhaps she will learn how to service the machine herself and save herself a lot of money.