Wednesday, February 8, 2012

My First Job

 Who knows why this post was stuck in drafts?  I wrote it last February.  Here it is.  I guess I am on the FW topic these days.  


As always, I was chatting about my obsession at work one day.  A woman I know mentioned that she had a little sewing machine in her attic that she hadn't used because it wouldn't stitch anymore.  After more inquiry I knew that it was a featherweight.  She brought it by work on Tuesday for me to fix.

Of course I could not wait until I got home to look at it.  When I initially talked with P. about the machine I figured it had a thread lock.  Then when I looked at the machine yesterday I saw that the "finger" on the bobbin case base was not positioned appropriately. 

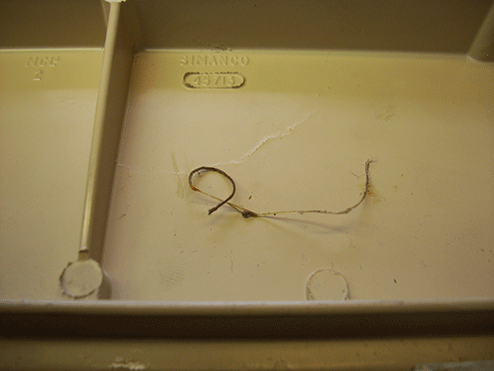
 This morning I set to work. I went through the whole machine and oiled every place indicated in the manual.  I like to give the machine a drink FIRST THING.  In this photo, you can see the errant thread. I took the bobbin case and bobbin out and got out my favorite Brownell bit (150-3) and removed the gib screw.


It took a bit of jiggling but the bobbin case base came out and so did the thread.

When I am driving to and from work this time of year, I know enough to look for more deer if I see one in the road.  Such is the case with thread locks in 221s and 301s.  I looked, and sure enough there was another tail of thread sticking out of the hook.  DANG.  So I had to get out the screw driver AGAIN.  The hook set screws are accessible through a "window" in the base of the machine.  I did not know that one of them sits in a flat.  I arbitrarily selected this set screw to remove all the way so that I would know which one of the screws would need to line up with the other screws at the bottom of the machine.  This way I would not replace the hook in the wrong position.  Turns out that this set screw was sitting in the flat. 

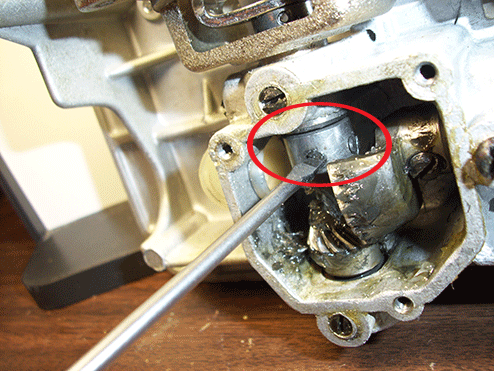
The arrow in this photo points to the hook shaft flat.  Now there's a catchy phrase.  Sounds like it could be a Country Music Song.  I couldn't get her stitchin, cuz I missed the hook shaft flat.

In order to get that piece of thread out, I had to remove this screw to get the looper off the hook. Can you see those scrapes on the back of the hook?  I think an errant needle made those.  Certainly the looper had some burrs on it.  I left them and these needle marks.  I decided that if it did not stitch well I could go back and sand them down. 


That was the biggest part of this job.  Once I had the thread lock out, the hook cleaned and back on the machine, I finished the servicing.  The bobbin winder was pretty dirty and required a fair amount of rinsing and spraying with canned air.  But finally it was suitable and I re-assembled the machine and got it stitching.
I spent two hours on it.  I am horribly inefficient.  I spent too much time getting the hook back on, despite my knowing about the hook shaft flat.  I did NOT remove the feed dogs or dis-assemble the tension.  I did clean them, of course.  I did have to adjust the tension number dial so that it would read at "4" .  I cleaned the machine itself with some Awesome and T3-3. The motor sounded happier and happier the more I ran it.  I think it was happy it got greased.  The brushes looked fine and the commutator was not too dirty so I did NO MOTOR work.

I think it looks lovely and what is more, it stitches.


Kenmore 158.1802

Betsy and I got distracted last  Saturday.  I went over to organize some of my Kenmore attachments so that I could figure out which I should keep and which I should sell.  I tried out a double cam in her Kenmore 158.1802.  It did not work.  So then we set to trying to figure out why.  We spent all day on the dang thing.   The machine would run JUST fine in all of its built in stitches but when we put in a double cam, it would only sew backwards.  It looked like it wanted to go forward, but it wouldn't.  I thought it just needed heat and oil.  We tried that.  Betsy got out the big screw driver, which scared me.  She also was very willing to run the motor with machine innards exposed and stick her fingers in there. Not me.  She practices primary care.  I need my hands for, well, exams and procedures. (Those of you who know what I do to earn my living will know what I mean.  The rest of you, I promise it is legal).  We kept wondering about this piece right here.  We called Ray White who confirmed that we were focusing on the right part.  We finally loosened those two set screws and moved it back on the rod.  That yielded a forward stitch but not a forward/backward stitch.  But at least it was going forward and the other stitches still worked.  But we felt like we were almost there. We gave up when we were too tired, finally had some tea and planned the sewing classes.
 
The next day, Betsy could not resist.  She got out a service manual printed for someone with 20/5 vision.  She must have had a magnifying glass.  But she fixed it.


Tuesday, February 7, 2012

Don't quit your Day job

I took this photo on Saturday when I was trying to time a Taiwanese made White badged sewing machine.
I was having trouble seeing exactly where the hook was in relation to the needle.  So I photographed it figuring I could enlarge the photo and see if it was where it needed to be.  
This machine is not one of the more desirable machines, but Betsy and I worked on it for HOURS and still could not get it to pick up the thread.  We figured it was the timing and so we looked for the set screws that would relase the hook so we could set the timing.

We thought these two set screws were the ones
But nothing much happened to the hook when we loosened these screws.  It certainly did not move easily, as the hook on the 66 does when its set screw is loosened.  Finally I convinced Betsy to let me bring it home and play with it.  It did not take much convincing.  I think she was ready to ditch the whole machine.
I brought it home and played with it. And I totally messed it up.   It is not a bad looking machine.  It is light weight though the bobbin gears are metal.

Turns out ( no pun intended ) that these two set screws are the ones that release the hook. Why they put those in there with those greasy gears, but I do believe thems the ones. 

So I tried and tried. I turned more screws and schmutzed up more adjustments on this machine than you can ever imagine. I  could not center the needle without making the right sided zag go onto the needle plate.  So I finally concluded that maybe it is a left homing needle and left it at that.  But not before I stripped a screw (I really don't know how that happened.  but it won't tighten down now.)  For details on how I schmutzed this up, check back later.  I still have not given up.  But I do believe that since I am turning 59 in less than a month, time is getting short for me.  I'd best not be spending DAYS on this machine.  I have too many others to work on that have real value.  Such as 2 Singer 201s that I know I can get running again.  Several 15-91s that merely need cleaning.   A couple of 101s that I should just get running and cleaned up because, well, after all they are 101s.  Two featherweights that need servicing and loving.   Sewing to do, a treadle top to make so that I can demonstrate treadling at the farmer's market on 2.18.12 . One more dog to groom  OH and the day job...

I did have business cards made up.  But I am thinking that maybe I have no business trying to do this.  Maybe it should just be a hobby and fodder for the blog.  But I love it and it is fun and I have been able to fix some machines for folks.  Maybe I should learn from this experience.  Put the tools away.


Monday, January 30, 2012

Max on NPR

 http://www.kwmu.org/programs/slota/archivedetail.php?date=%272012-01-30%27


 Click on the link above if you would like to listen to my son participate in a panel discussion about Mormonism.  I am bragging because he is a  very articulate and  thoughtful scholar.   I never imagined this day when we had this photo of him taken.
I just loved his hearty laugh and twinkling eyes.    Do his ears look big to you?

Sunday, January 29, 2012

A room of its own

I have a mid arm quilting machine.  It is home grown with foreign parts, I believe.  I bought it  in 2010 with the intent of learning more about machine quilting.  I got a deal on the frame and I splurged on the machine.  What the heck, it was built near my home town and I am a sucker for nostalgia. 


My sewing loft is not heated and this machine lives there.  I could bring it in the house,  but I don't really have a place for it in here.  I thought that I would insultate the floor of the loft really really well and then have an electirc heater hardwired to the circut breaker and just keep the loft at 50.  Steven said the Barn is not built to code and it would be very inefficient to heat it with electricity because we could never get it insulated well enough.  I don't want to waste energy.  I can't keep a wood fire going all the time, either.  The little Jotul puts out a goodly amount of heat but it requires stoking every few hours.  Can't do that.  So, I thought, why not build a little box that sits over the Bailey, like a coffin top?  Then I could stick a light bulb in there and keep it warm that way.  We have used a light bulb under the floor boards in an old house to keep the pipes from freezing.  Heck we still stick a work light under the washer when it gets to sub zero.  Should work, right?

I had imagined a nice plywood box.  Steven suggested using rigid foam insulation and gorilla tape.  He even bought me the foam and showed me how to use his sheet rock square. Clearly the guy did not want to build me a plywood box.  I was willing to build it, but the table saw scares me and I would need to purchase the plywood, rip it down, brace the corners, screw it and glue it and mount the lamp socket.  So, while I initially resisted the idea of the rigid foam insulation, I set to work on this project today.
 
The idea is to score the cut with the utility knife and then go back, cut deeper and then cut the foil from the opposite side.  I wasn't so good at that.  Practice will improve my technique, I am sure.  
I cut three pieces 16 X 32.  (32 X 3 =96 which is aka 8 feet.)  I had no waste from that calculation.  The ends I cut 14 by 16 so that they could fit inside the sides and top.    I cut a 32 inch long piece  14 inches wide from the remaining 32 inch wide foam board. Then I cut that piece in half.  No waste there either.  I now have a a piece of rigid foam insulation that is 32 inches wide by 82 inches long left over for another project.   It appears that I know what I am doing wrt layout and piecing.  Not so.  Steven figured that whole thing out for me.

 Then I taped the whole thing together with gorilla tape and duct tape.


I wanted the light bulb mounted on the side of the box.  That way it would not touch any part of the machine.  I had bought a lamp socket at the hardware store and used it as the marker for the hole.

Then I used a very narrow knife to cut out the hole so that the lamp socket would fit.  I originally bought a nifty socket that would plug directly into an extension cord.   


But when I tried it out, the bulb was too close to the foil and it got too hot.  So I wired up the lamp socket and it works quite nicely..

These next photos I took with the camera on self timer from inside of the box.   The light bulb is no where near the machine.  


At first I used a 40 watt incandescent bulb.  
But it got way too hot.  So then I tried a 20 watt low energy bulb.  Still too warm.  The lowest wattage that I had was 13 watts.    I checked it after dinner and Steven approved.  Temperature inside the box 70 degrees.

I am a bit concerned that the mice might like it in there.  I did not do a great job cutting the end pieces and had to trim after the box was together.  I trimmed too much and there is room for the little vermin to crawl under there and warm up.  Fine, just don't shit on my machine.....  No building nests, no taking up residence.  Just get warmed up a bit.  Then leave...

I just checked it again.  68 degrees.  No mice...


Friday, January 27, 2012

olderisbetter65

Well I bought some sewing machine accessories and attachments on ebay and they arrived this week.  I am well aware of the concept Buyer Beware.  Still, I thought that purchasing accessoires might be a safe bet.  The lot included a light bulb.  In the photo on eBay it was in perfectly perfect shape.

When I opened the box yesterday, it wasn't in such perfect shape. Of course, packed with Styrofoam peanuts, there was no hope. 

 So I thought I would email the seller.
 Dear olderisbetter65,

Thank you for shipping so quickly. Because you packed the light bulb with the presser feet and did not wrap it at all, it broke. Please comment


 The reply:

im sorry about the light bulb, i just stuck everything back in there the way it came to me after taking them pics, then when i shipped it out it never crossed my mind, i am sorry


- olderisbetter65
 

I, in turn, responded:
Dear olderisbetter65,

As a business person, I believe that you are responsible for shipping your sold items safely so that they arrive intact.


The reply to this :


i agree, everything else was safe i hope, im thinking the bulb is worth about 25 cents , do you want me to send you a quarter?


- olderisbetter65
 
 I am pretty much done with this interaction.  And since I don't want to perpetuate negativity, I won't leave any feedback.  But this seller is in my never again list. 


Monday, January 23, 2012

Company


I spent Sunday and Monday on the couch.  Usually I work on Monday at my day job and Sunday I am in the shop with the machines.  Let's just say I was indisposed.  Both boys sleep next to me when I am sitting on the couch, but when I am napping, there is only room for one of them.  Good dogs, they took turns.