Showing posts with label Singer 66. Show all posts

Saturday, August 10, 2013

Free Motion Quilting

I love sewing with my 15-90 treadle.  I have been making slip covers (update to follow).  Today I finished the fourth of eight and decided that I wanted to try something else.

I had a mini quilt sandwich pinned together.  It is stenciled with a design and I thought I would try.  I did it.  I have a lot of practicing to go but I thought it isn't too bad for my first attempt.
 Now I realize that this is very rough and that is ok.    I fell down a lot when I first learned how to ski. 
 I did not expect to be an expert first time on the slopes.  Likewise with FMQ.   I have to say, though, that it is a bit easier to control the speed of the machine with the treadle vs an electric machine.  I have done this before using my Viking Husqvarna Quilt Designer II.  But it has a speed control.  I like treading much better. 
I used wax paper on the bed of the machine and on the treadle stand, too.

I used some machine quilting gloves to give me better grip on the fabric.  The edge is hard to manage.  I have to figure that out.  

I proved to myself that I can do it.  Now it is just practice, practice, practice.

On the other hand, I am much better at FMQ on the GMQ frame.


True, I have had more practice but I do think that it is easier to move the machine than it is to move the fabric. 

I am using the Singer 66 for this project.  I love the stitch it is making.  I also love how much room I have to quilt !  When I used this frame with a free arm White Jeans Machine, I had a narrow quilting area.  The 66 affords a much larger space.  It was for that very reason that I spent SO MUCH TIME setting up the 66. 


Saturday, February 11, 2012

Sewing

I started this bag last weekend at Betsy's.  She got the fabric   in a box lot at an auction.  I was trying to figure out a lesson for our class.  I got distracted by this.  It is a print of a quilt design.  I don't like it but I had to finish it.   On Wednesday I "quilted it" on the Singer 66 treadle.  I just followed the lines of the pattern.  It was tedium defined.  The lining fabric is an old bedspread and so it did not have much loft at all.  The quilting improved it only a little.  Today I attached the straps after I zig zagged them on the Kenmore 18031.  Then I tried stitching the straps to the bag with that machine and it just would not handle it.  And the motor is growling at me.  It is not at all quiet the way my 158.1760 is.  I found sewing with the 18031 an altogether unsatisfactory experience.  So I turned around in my chair and tried the 31-15.  Magic.  It sailed right through everything.  I had some trouble getting the knack of the needle lifter but I love that feature.  Now THAT was an altogether satisfactory experience.  So I finished the stupid thing and now I have another odd shaped bag.


Betsy is teaching triangle construction  She assigned me the task of teaching how to make a nine patch square.   I made a nine patch block quilt several years ago.  I got that pattern out and played with it a bit today.

Of course I don't want to make the whole quilt......  But I did want to review the process.  This is what I have so far.

I started with the purple print.  It was a scrap from my very firt quilt and I LOVE this fabric.
 I had an odd shaped piece so I cut   21/2 inch strips out of the biggest part of that scrap which yielded six 32 inch long strips.

I cut six 2 1/2 inch strips out of the lighter green
and sewed them together in strip sets.  One strip was purple/green/purple.  The other was green/purple/green
Each strip set is then cut into smaller strips 2  1/2 inches wide.  Then you can place them in blocks and determine which design you like the best.

MY CHOICE
Next I stitched the strips together to create the block.  I like to preserve time and thread so I sewed them in a chain.
 Paying careful attention to matching the seams.
 Tomorrow I will show you how I connected the squares.


Tuesday, December 20, 2011

Bobbin case on older Singer 66

Earlier this week I posted a link on the Yahoo group WEFIXIT  to my blog post about how to remove the bobbin case on my Singer 66-16.  Bill Holman, a very knowledgeable and well respected OSMG, commented that folks with older Singer 66s would not be able to remove the bobbin case or position bracket based on those directions.

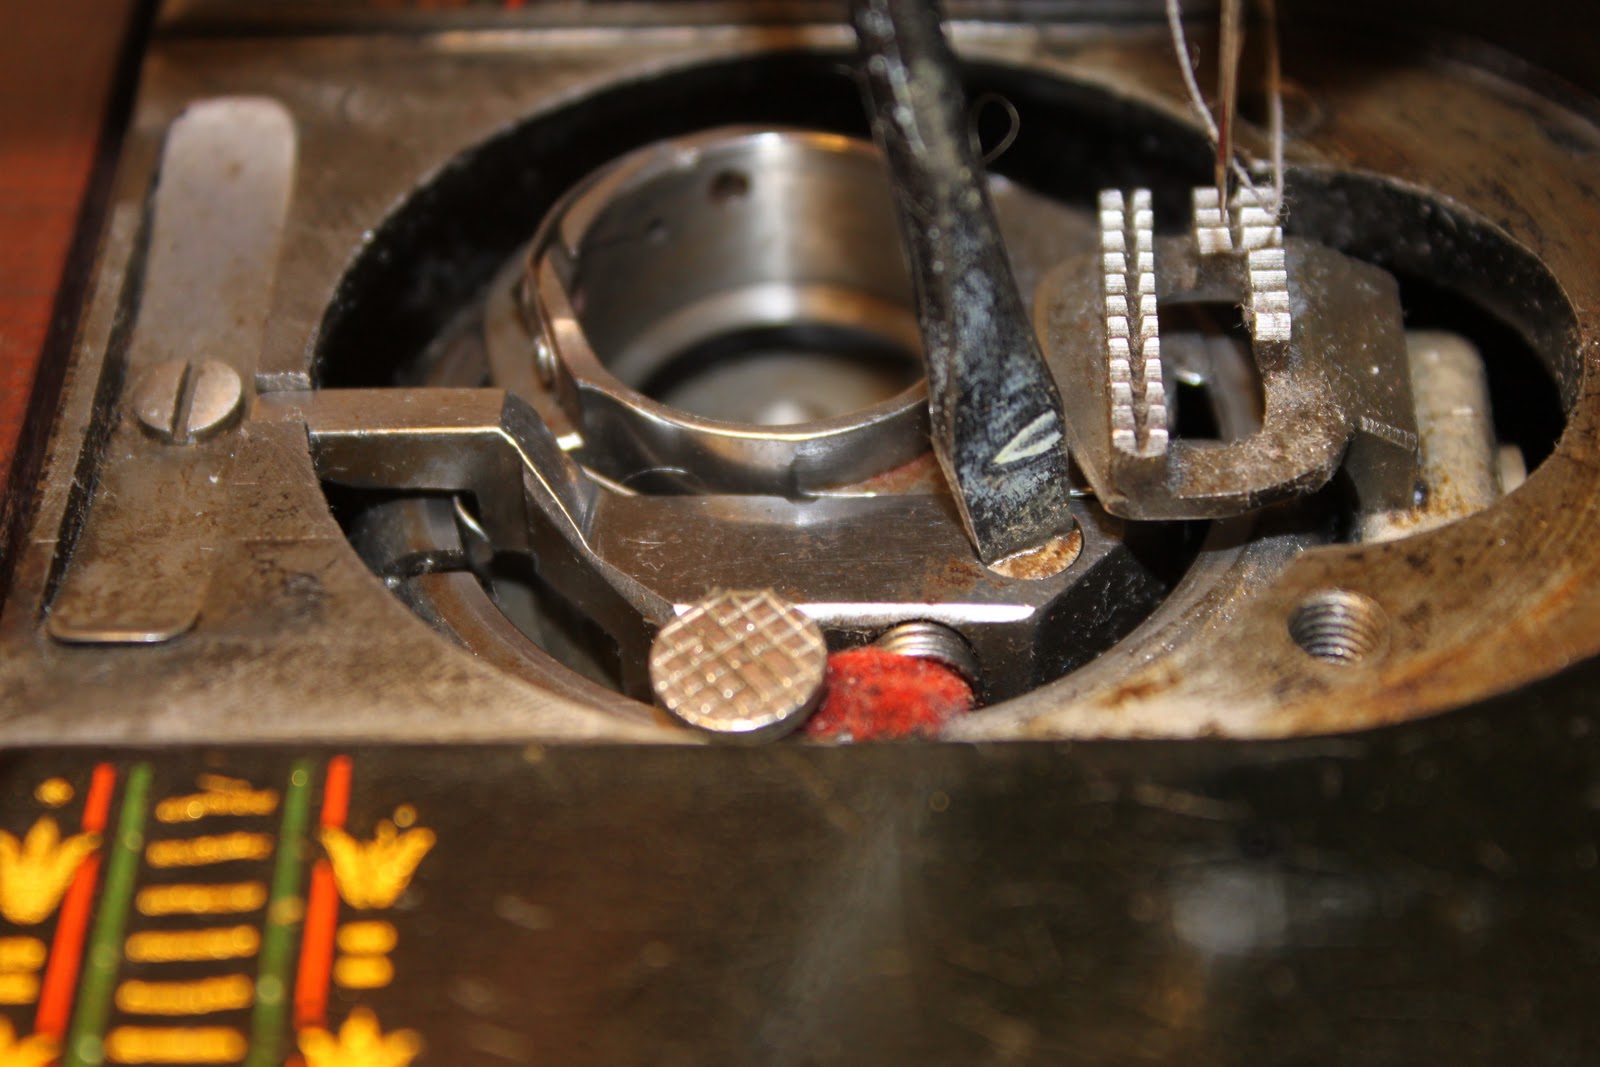
So tonight I photographed the bobbin case and position bracket  on Irene, my Singer 66 Red Head.  Here is how that bobbin case comes out.

You can see that the "finger" on this bracket  is much heftier than the one on the 66-16 and is not flexible at all.  See the screw in front of the feed dog?

You have to remove that to remove the position bracket to get out the bobbin case  on these older Singer 66s.

 There was a comment made, on the WEFIXIT , that it is not necessary to remove the feed dogs (cats) to remove the bobbin case.   I can see that is true from this photo.  Still it might make it easier, especially if the dogs (cats) are packed with lint or the bobbin case is particularly dirty. ( I don't think that is really rust on that screw, I think it is just dried oil...  oh the truth comes out with digital photography.)

Another thing to notice in this photo is the oil wick.  It is that piece of red felt that looks like lint.  I oil that with every bobbin change.  I use Tri Flow and I just confirmed (again on WFI) that this is an appropriate lubricant.

The screw driver I am using is authentic Vintage Singer, I believe.  It is authentic Vintage, for sure.  It came with one of my authentic Vintage machines and I see them for sale on eBay.  I am lucky that I have several that came "free" with my old machines.

Working on sewing machines makes me happy.  Sewing on this treadle makes me happy.  I wish my day job made me this happy. 

Sunday, October 16, 2011

Another Singer 66 Continued

I got home about One oclock this afternoon with the new machine.
I spent about three hours cleaning and oiling and I have many more to go. The needle bar, the presser bar, the foot and the tension assembly parts are all clean.  I could not resist spending some time on the body.
Oh how I love this hobby.   I have no idea what that red streak is on the left side of the photo.  It isn't on the machine, I  reassure you.  I used Dr. Woods Almond oil Castile soap that I found in the natural foods section of my grocery store.  I think Dr. Bronner's makes one too.  I rinse with sewing machine oil to get the soap residue off.  I will try to apply a wax over this to keep it clean, but I haven't yet.


Saturday, September 17, 2011

Lucky Girl, Clever Girl


I dropped this set screw on Wednesday.  I was working on Syracuse Gramma's tension and dropped it.  I  got down on my hands and knees, moved a bunch of stuff and searched with the flashlight.  Finally I decided that it was just GONE.  This morning I was determined to find it and decided that the best way was to take my magnetized screw driver and scan the floor.  No need.  I looked down and there it was, in plain site.  Lucky me.

Before I dropped the set screw I discovered that there was no spring attached to the tension release lever.  After I dropped the screw I was almost ready to make this 66 a parts machine.  Almost.  I have a horrible time letting go of machines.  I wondered where I might be able to scam a spring for this lever.  When I was cleaning out a little clip on flashlight, trying to save it, out popped its spring and an idea was born.  sure enough it fits, sort of.  It certainly is not the same spring but it works and that is about all that matters.  Clever me.


Sunday, August 28, 2011

Don't blame the Bordeaux

 Hurricane Irene came ashore on Coney Island (160 miles south east of here) this morning around 6 AM, I am told.  We have yet to lose power.   I have Steve's "fire monitor" pager on and there are flooded roads and basements and downed trees, power and phone lines all around.  As of now, (6 PM Sunday) the wind has subsided and the rain has slowed to a drizzle.  Maybe I dodged this bullet.

I spent much of the day in the shop.   Lucky me.  In the time it took the Westford fire monitors to respond to the report of a flooded road on County Rte 36 and close that portion of the road, I re-wired this light.   Clever girl.  I was so pleased when I had it all done.  I had taken pictures as I dismantled it to be sure it went back together the way it came apart.   I guess next time I will look at the pictures.  Luckily I hadn't soldered anything. 

It makes me laugh.  But that's the point of this hobby; JOY.


Wednesday, August 24, 2011

Before and After


BEFORE


AFTER
This cleaned up so nicely.   I soaked this in some rust remover that I bought at the hardware store. Some sort of pink gel rust remover.  It did a great job. Though I am not convinced this was rust.  It might be tobacco smoke residue. These machines also have a piece that covers a hole on the back of the machine.  Unfortunately, this one is missing.  Too Bad.