This morning I decided that I would just put this thing back together and tuck it away. There is a "catch" somewhere and I cannot find it. Occasionally there is a drag on the handwheel as I turn it. I have oiled the begeezus out of this Kenmore and it still has that hesitation. Oh well, time to move on. So I got it all re-assembled and tried out the stitch. Not bad but there was something terribly wrong with the presser foot. NO PRESSURE. I looked inside and discovered that I had neglected to replace the spring that belongs on the presser bar. Luckily I found it. At my feet.
The stitches looked pretty good but I was turning the handwheel , well, by hand. The better test would be after the motor was installed. I had some re-wiring to do before I could put that back on.
I elicited a second opinion about the wiring to the three pin terminal. Steven advised that it looked fine. I was all to happy to agree with him. "If its not broke, don't fix it." The wires look fine inside the knee controller box. Less work. So I set to replacing the power cord. Those wires did not look fine inside the knee controller box.
I was stymied, at first, over how to get those wires off. I have been using screw drivers as my main tool for much of this repair work. Now I was confronted with NUTS. Oh great. I did not have a good set of wrenches. But wait, don't I ? Yes I do! I have a
NUT DRIVER. And it was the PERFECT size.
I found a nifty quick wire plugs at the hardware store. I used one over the weekend and loved it. I picked up another today. It certainly is easy. I recommend it. Of course I could have done the Bill Holman technique: an inexpensive extension cord with the molded plug. He recommends that you merely buy one and cut off the female end and there you have a molded factory fresh safe plug. Which is true and a good option. I just have so much wire that I opted for the quick connect plug.
Once I had the cord all re-wired I set to work on the light .
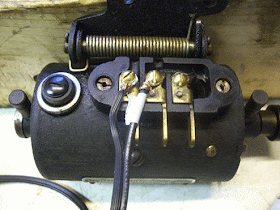
It was in tough shape. I released the wires from their connection to the three pin terminal attached to the motor body. I marked the "white" lead with white tape before I unscrewed the wires.
And pulled it apart revealing the paper lining and the screws that connect the wires to the lamp
I was then able to loosen the wires inside the lamp. I marked the side that corresponded to the "white"(in this case striped) wire.
Then I threaded the new wire through the base of the lamp and
Fastened the new wire to the screws on the lamp and soldered some wire rings at the other end.
Voila
then I re-connected the wires. Upside down. gee whiz, I am an idiot
So I had to turn it all around and fix it.
OK. So once that was all together and I put the cover plate back on I was able to install the motor on the machine and try it out. The only problem was that this is a knee controller and I do not have an accessible Kenmore cabinet. I have a Kenmore cabinet. It is not accessible.
So I screwed the knee controller to the top of my work bench, upside down, and just controlled the machine by hand using the knee controller. Not ideal. But it worked. And I was able to stitch with the machine.
It is noisy and clattery but it stitches. I think once I get a new drive wheel for it the clunkiness will settle down.
It is fast and strong. Again, pretty nice stitches despite my shenanigans with the tension assembly and the hook. The thread was dirty dirty dirty when I was first stitching with it but that was because the hook is dirty dirt dirty and oily from my working with it. I succeeded in getting it to stitch. That, for me, is a milestone. This machine is totally different from the Singers. So, I feel rather smug that I could apply basic knowledge from one machine to another. Now I want to get a White 77 rotary. They are fancier. There is one on Craigslist. But I have no room. Really.


No comments:
Post a Comment